The Google Home Developer Console provides a Test page where you can configure and run tests against your Matter integration using the Google Home Test Suite. The Test Suite is a separate application built into the Developer Console that handles all integration testing.
Devices for the integration's Vendor ID and Product ID must be commissioned and available in Google Home app (GHA) for the account being used with the Developer Console in order to be tested. See Pair a Matter device for more information.
The Test Suite can be run on a set of devices that belong to a specific Matter project configuration. It is very important to run the Test Suite on your integration(s) to ensure that everything is working properly.
On the Test page, Matter integrations that are complete and ready to test are listed in the Ready to test.
Matter integrations that have been tested are listed in the Tested section.
Types of test plans
These types of test plans are available:
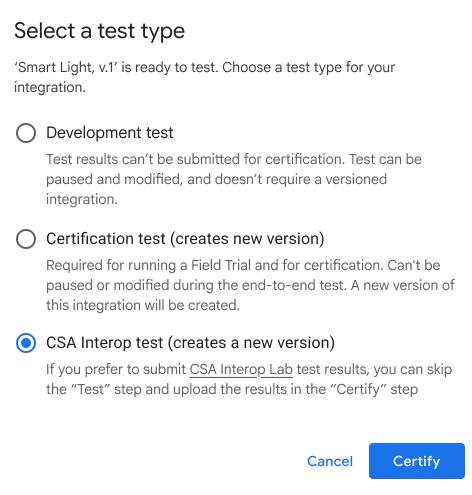
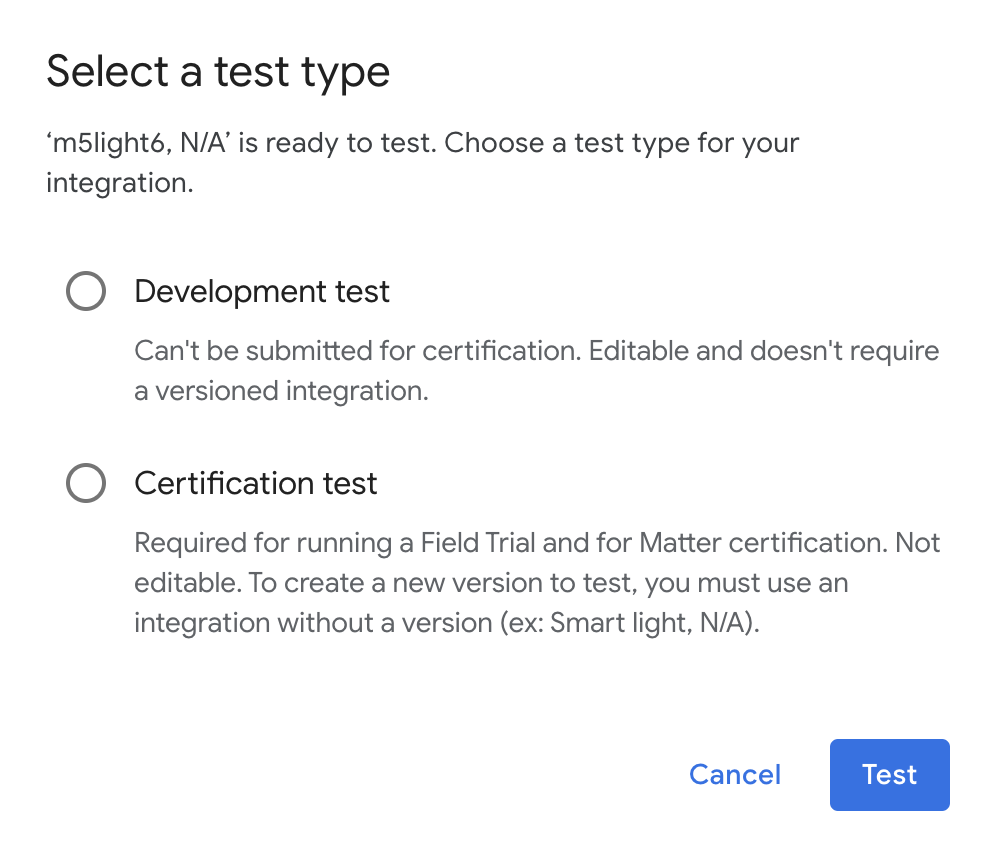
Development test plans are used to test controlling devices using Matter. They are editable, but cannot be submitted for Matter certification.
Certification test plans are specifically for Matter certification, and are not editable. Selecting this option will create a new version of your Matter integration.
CSA Interop test plans allow you to skip the test stage and use your Connectivity Standards Alliance (Alliance) Interop Test Lab results. This test option is available for all supported device types.
Use the Test Suite in the Developer Console to submit test results for certification. If you want to run the Test Suite for testing purposes during development, see the Google Home Test Suite page for the standalone version.
Integration versions
When you create a test plan for certification, a new version of the integration is created. This numbered version is listed in all integration lists in the Developer Console from the Test tab onwards.
New versions are never created from other numbered versions. For example, the first test plan you create for an integration will create version v.1 for that integration. Creating another test plan will create version v.2 for that integration, but this version will not be based on v.1. Instead, this version is based on the unversioned instance of the integration, same as v.1 was.
The N/A version of an integration represents the unversioned instance of the integration, which is managed on the Develop tab.
In other words, on Matter > Test in the Developer Console:
- If you click Test for version N/A of the integration, a new version is
created. The version number will be one higher than any existing numbered
versions.
- If no numbered versions exist, version v.1 is created.
- If version v.1 exists, version v.2 is created. If version v.2 exists, version v.3 is created, and so on.
- If you click Test for a numbered version of the integration (for example, v.1), a new version is not created. Instead, version v.1 is tested again.
For more information, see Integration versioning.
Create a test plan
Integration versions are a snapshot of an unversioned integration. This means that when you create a test plan for certification, and thus an integration version, all metadata related to that integration must be the information you want to use for the launched integration.
Before creating a test plan for certification, make sure you have done the following:
- Created a company profile.
- Entered the production Vendor ID (VID) for the integration.
- Configured setup and branding.
If you have not completed all of these for your integration, an integration version created for certification testing cannot be certified. You will have to create a new version, which means redoing the Test, Field Trial, and Certify steps.
You will also have to create a new version and start over if you want to update your branding before an integration version is certified.
To create a test plan:

From the list of projects, click Open next to the project you want to work with.
In the navigation menu on the left side of the page, go to Matter > Test.
Click Test for version N/A of the integration you want to test. This action creates a new integration version.
Select a test type and click Test.
- Select Certification test if you are preparing for certification in the Google ecosystem.
- A Development test cannot be used for certification.
- Select CSA Interop test to use your Alliance Interop Test Lab results to skip the Test and Field Trial stages in the Matter integration flow.
On the Configure your test screen, provide a name for your test and click Automatically pair device to select a device to pair.

For an Android device:
- Make sure you installed GHA to your phone.
- Connect your phone with a USB cable to the host machine.
- You must
Enable USB debugging on your device
The
APKcom.chip.interop.moblysnippetwill automatically download and install. - Once your phone is connected, enter the Pairing code and Device name to auto-pair your device.
For an iOS device:
- You will need to manually pair your device. See the Google Home App section for instructions on manually pairing.
- If you have an existing device, you may be asked to unpair the device and pair again or pair a new device.
Click the Next: Test plan button.
On the Create a test plan page, in the Test suites section, select the test suites you want to run.
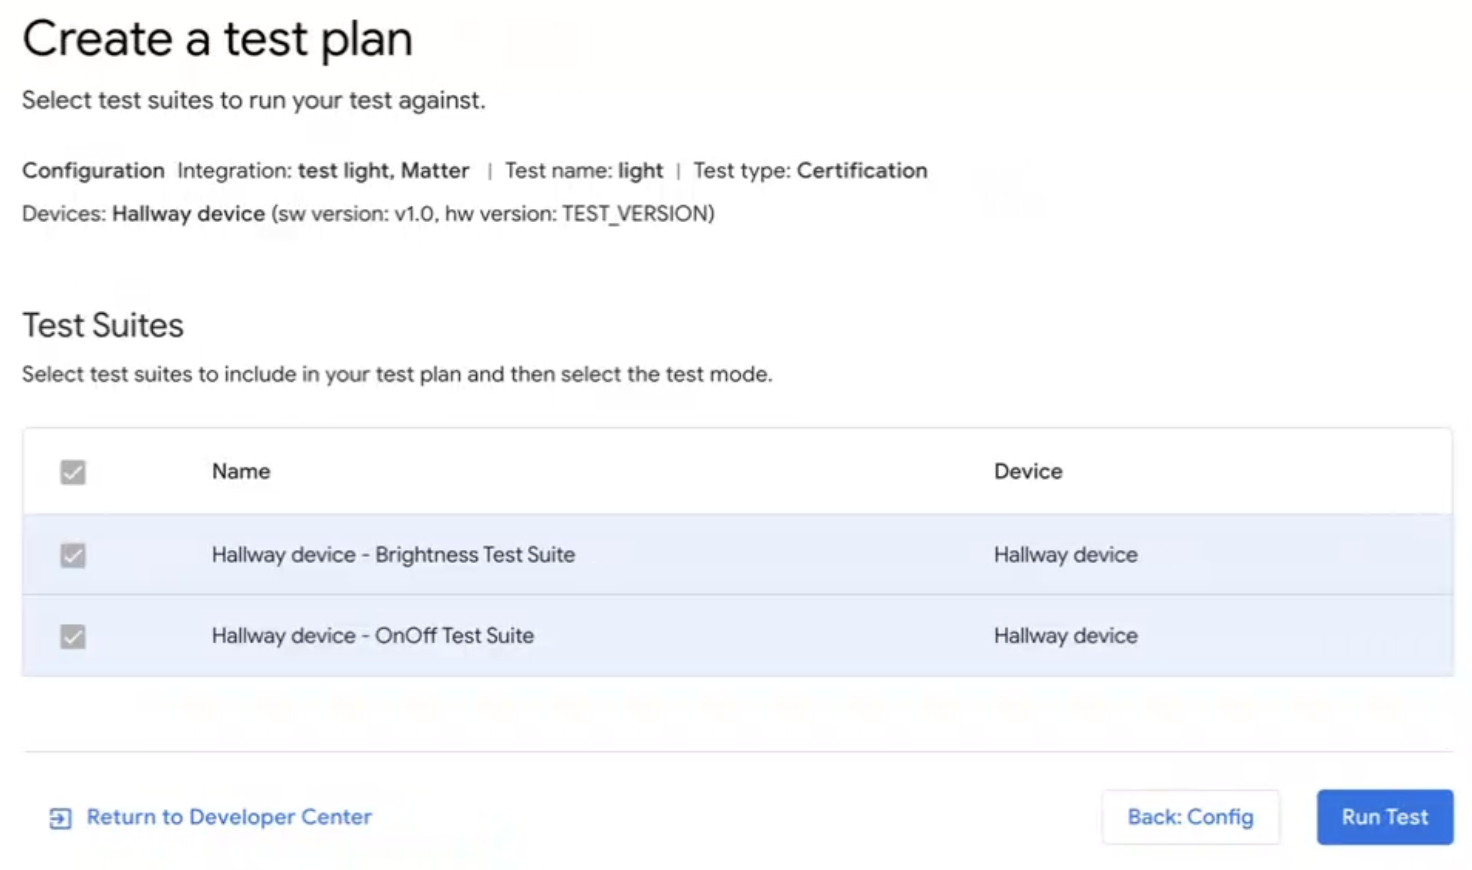 If you want to exit out of the Test Suite, click
Return to Developer
Center.
Run the test plan
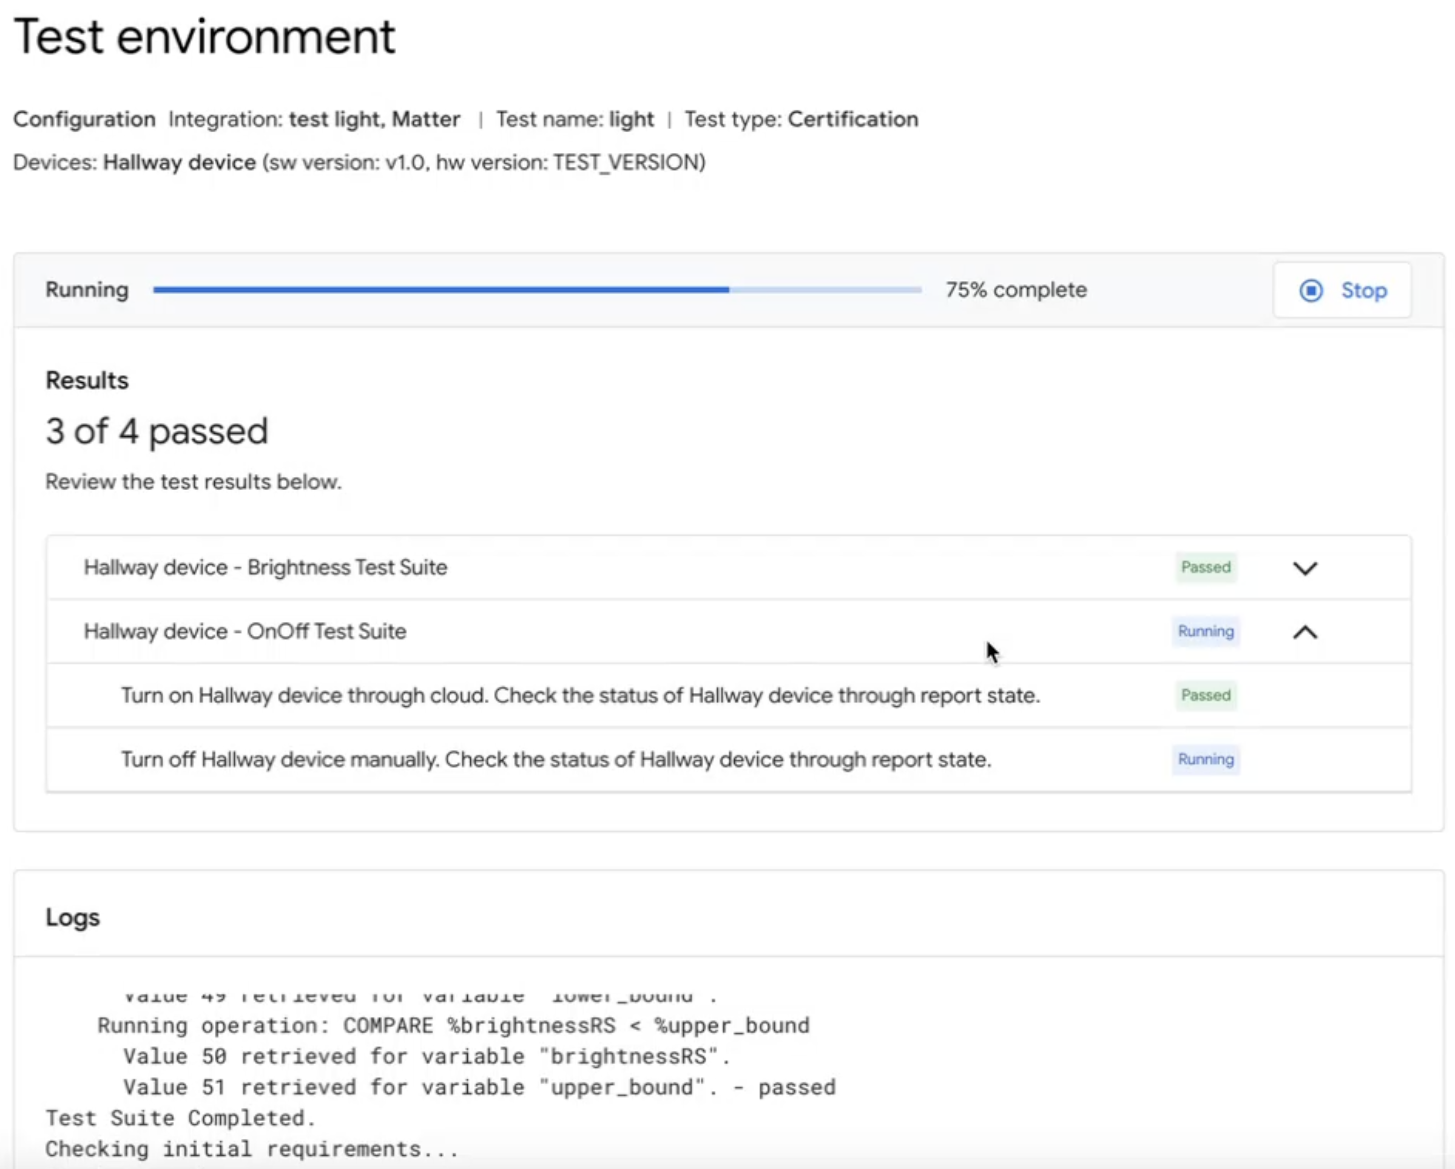
In the Test Suite, from the Create a test plan page, click Run Test. The Test environment page appears, with the status and logs of all tests.
Your test results appear once the tests complete. The status of each test suite execution appears next to it (Passed, Failed).
The Logs pane shows the status of each individual test execution.
 To retest a test plan from the Test environment page, click
Retest at the top
after test execution has completed.
Once finished:
- Click Done to go to the Test history page, or
- Click Submit to submit the test results for certification.
View and interpret your test results
On the Test history page in the Test Suite, you may view previous test results for a development plan or an unsubmitted certification test plan by clicking Retest for the desired test plan in the Test plans section. This takes you to the Test Environment page which displays the results of that test.
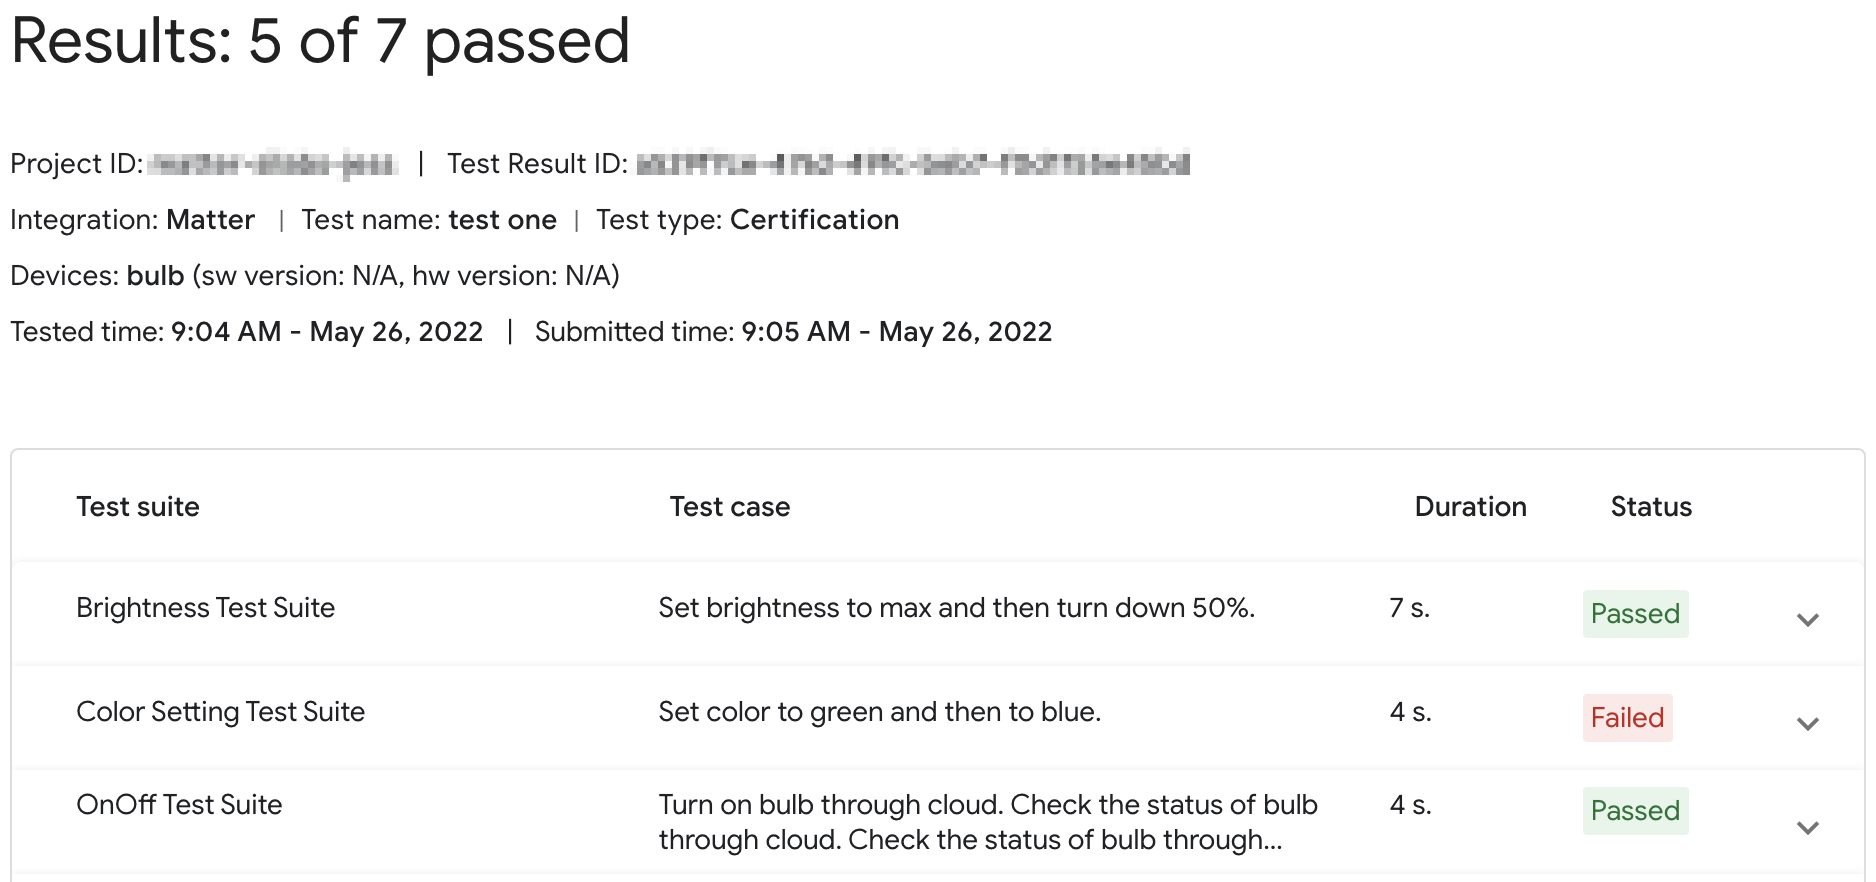
For a submitted certification plan, click Results in the Saved for certification section to view the test results report.
Test results may also be accessed for an integration version from the Test tab in the Developer Console. Click View for the Test history of any integration version listed on that page to be taken to the Test history page in the Test Suite.
Console statuses
The following Console statuses are encountered in the Test phase:
| Section | Status | Description | Requirement | What to do next |
|---|---|---|---|---|
| Ready to test | Ready | This version of the integration is ready to test. | N/A | Test this version of the integration. |
| Tested | Ready | This version of the integration was tested and can be submitted for Field Trial or certification. |
Version was tested and saved. All failed test cases include justifications for Google to review. |
Retest, if desired. |
Retest
Certification
If you need to retest for certification, you need to pair your device after you start retesting.
Development
If you need to retest for development, you can use the existing device without pairing again.
Troubleshooting
Commissioned device does not appear in the Test Suite
If you've paired a device with a test Vendor ID (VID) and Product ID (PID), but it does not appear when you attempt to test the device with the Test Suite in Developer Console, this is likely caused by using the same test VID and PID combo across multiple integrations.
To troubleshoot, remove all test devices from Developer Console and pair the device you wish to test again.
To validate that you've paired the correct one, you can set the Manufacturer and
Model information (CHIP_DEVICE_CONFIG_DEVICE_* values) for the device to
unique values in your test firmware.
See Device information for more information.
Verify the VID/PID of your device
If you want to start developing your integration with Google, you must create a project and an integration on the Google Home Console.
The VID/PID value your device is beaconing should match the VID/PID entered into your Developer Console project.
- VIDs
0xFFF1—0xFFF4are reserved for testing. They may be used for basic commissioning and control tests, but they can't be used during the following phases of development:
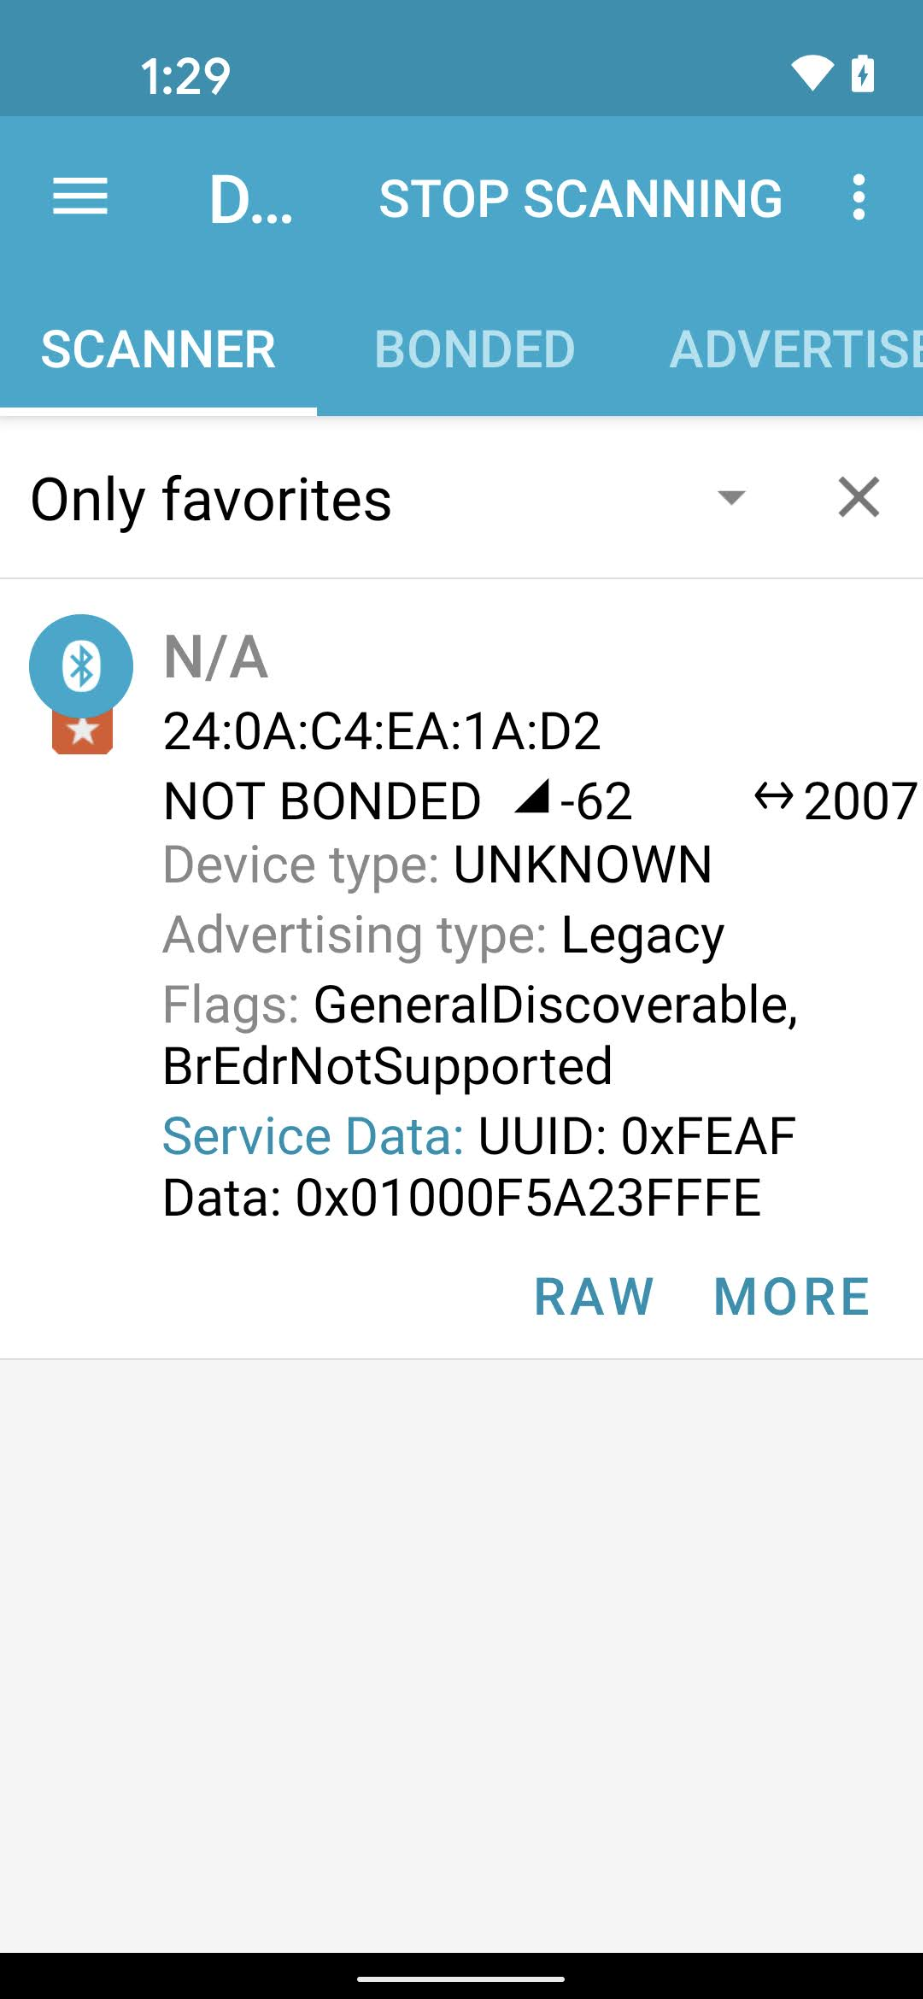
Using a Bluetooth engineering app such as nRF Connect for Mobile, you can see the VID/PID of the beaconing device in the Service Data field.
In this screenshot from the Android version of nRF Connect,
you'll see the VID/PID is listed as 5A23FFFE starting at the fourth byte of
the Service Data field. This indicates a VID of 5A23 and a PID of FFFE —
both in little endian format.
The BLE app displays the values in little endian, but the VID/PID values you enter into your Developer Console project are in big endian.
Validate that the right values and format have been entered into your Actions Console project based on what the Bluetooth sniffer is showing.
For the values in the example screenshot, the VID and PID in the
Developer Console would be 235A and FEFF, respectively.
