
1. Before you begin
The Google Home APIs provide a set of libraries for Android developers to tap into the Google Home ecosystem. With these new APIs, developers can build apps that seamlessly commission and control smart home devices.
This video provides a brief walkthrough of the mobile app you'll be building, so follow along with the video as you do the codelab.
Google provides an Android Sample App for developers who want to access a working example using the Google Home APIs. This codelab is based on a branch of the Sample App that walks you through how to use the Permissions, Commissioning, Device, and Structure APIs.
Prerequisites
- Knowledge of the Google Home ecosystem (Cloud-to-cloud and Matter).
- A workstation with Android Studio (2024.3.1 Ladybug or later) installed.
- An Android phone that meets the Home APIs requirements (see Prerequisites) with Google Play Services and the Google Home App installed. An emulator will not work, only physical Android phones are supported for the sample app.
- A compatible Google Home Hub that supports the Google Home APIs.
- Optional - A smart home device compatible with the Google Home APIs.
What you'll learn
- How to build an Android app using the Google Home APIs with best practices.
- How to use the Device and Structure APIs to represent and control a smart home.
- How to use Commissioning APIs to add devices to the Google Home ecosystem.
Optional: Set Up Your Home
Prior to using the Google Home APIs, you'll need to set up a home on your Google Account using the Google Home app, and add a few devices. This section discusses how to do this using the Google Home Playground, which provides virtual smart home devices.
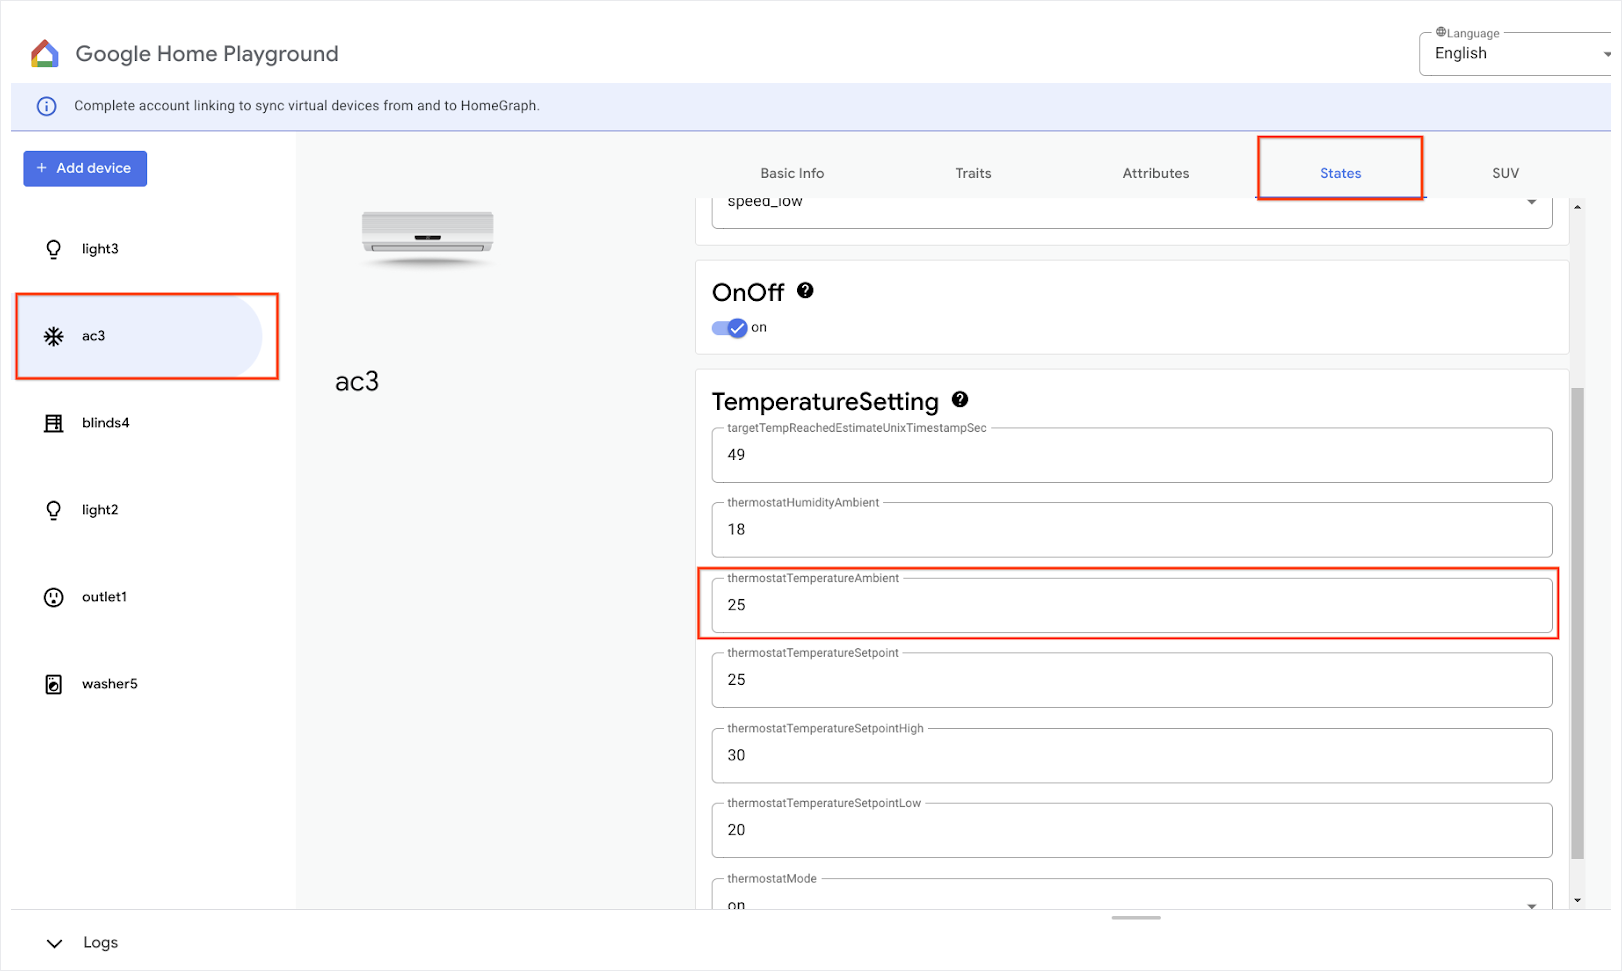
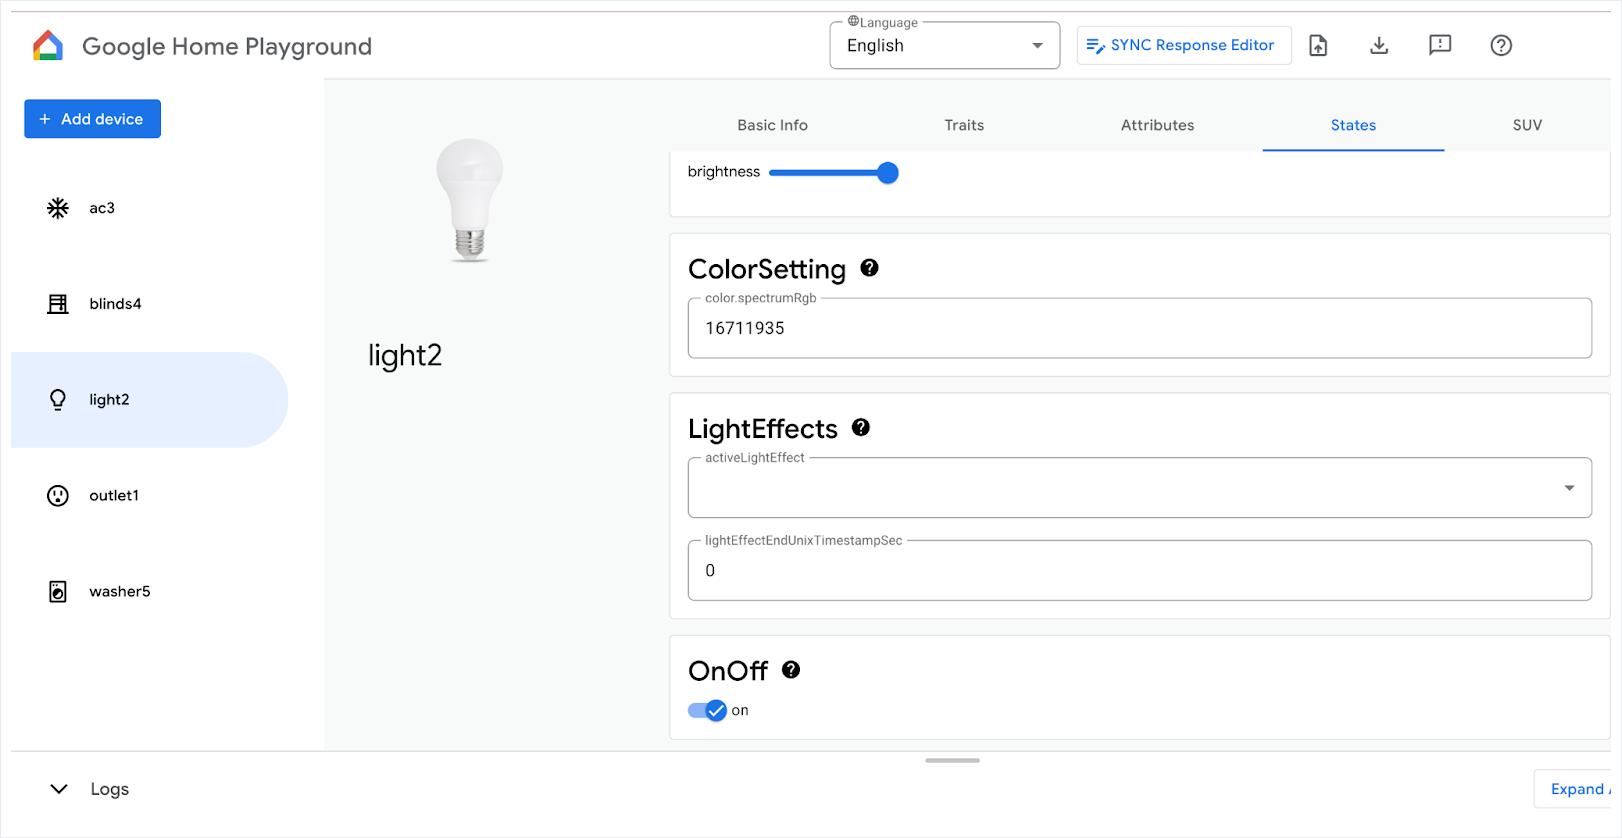
Open home-playground.withgoogle.com in your web browser, sign in with your Google Account and see if the following emulated devices appear:
- outlet1: On/Off plug
- light2: Dimmable light
- light3: On/Off light
- ac3: Air conditioner
- blinds4: Window Covering
- washer5: Smart washer
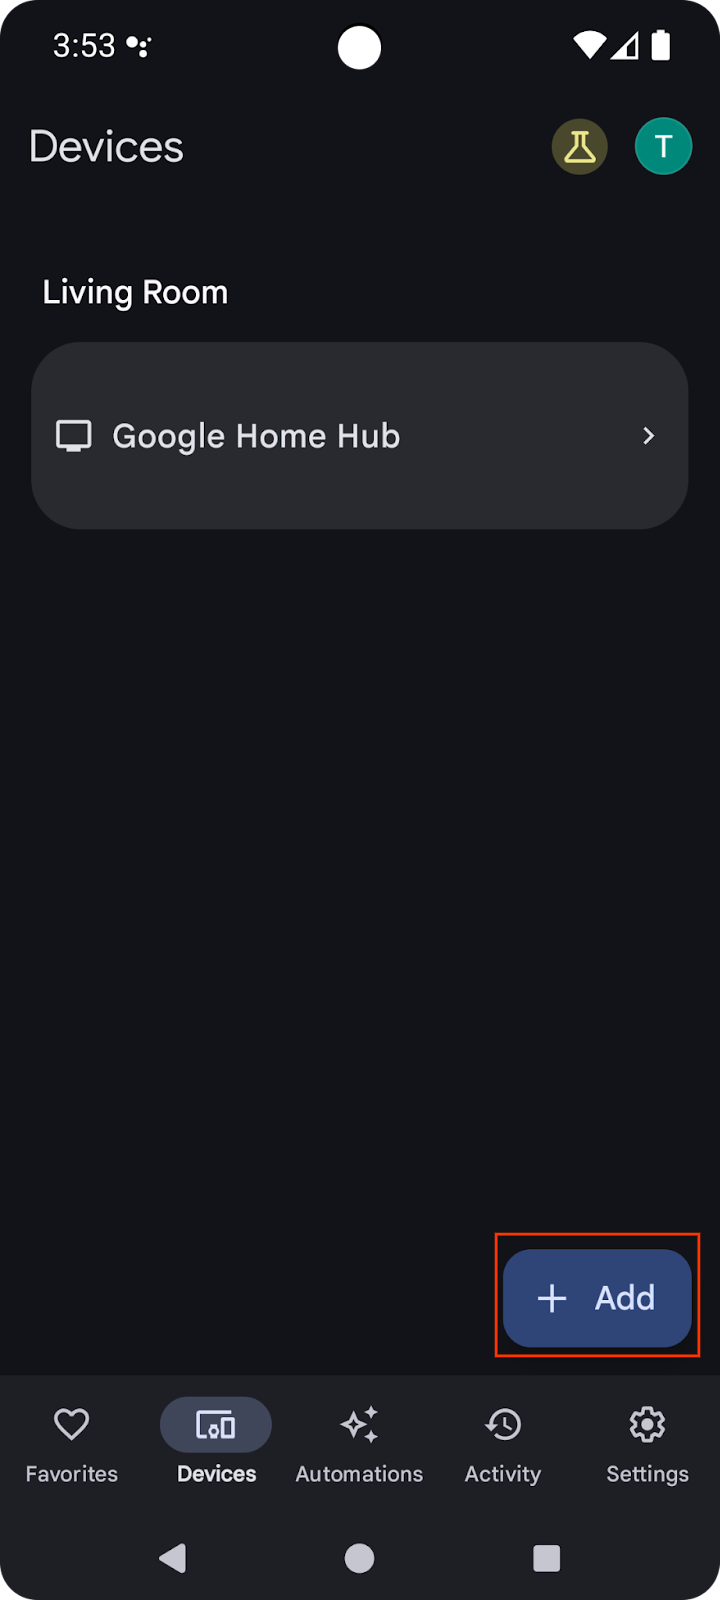
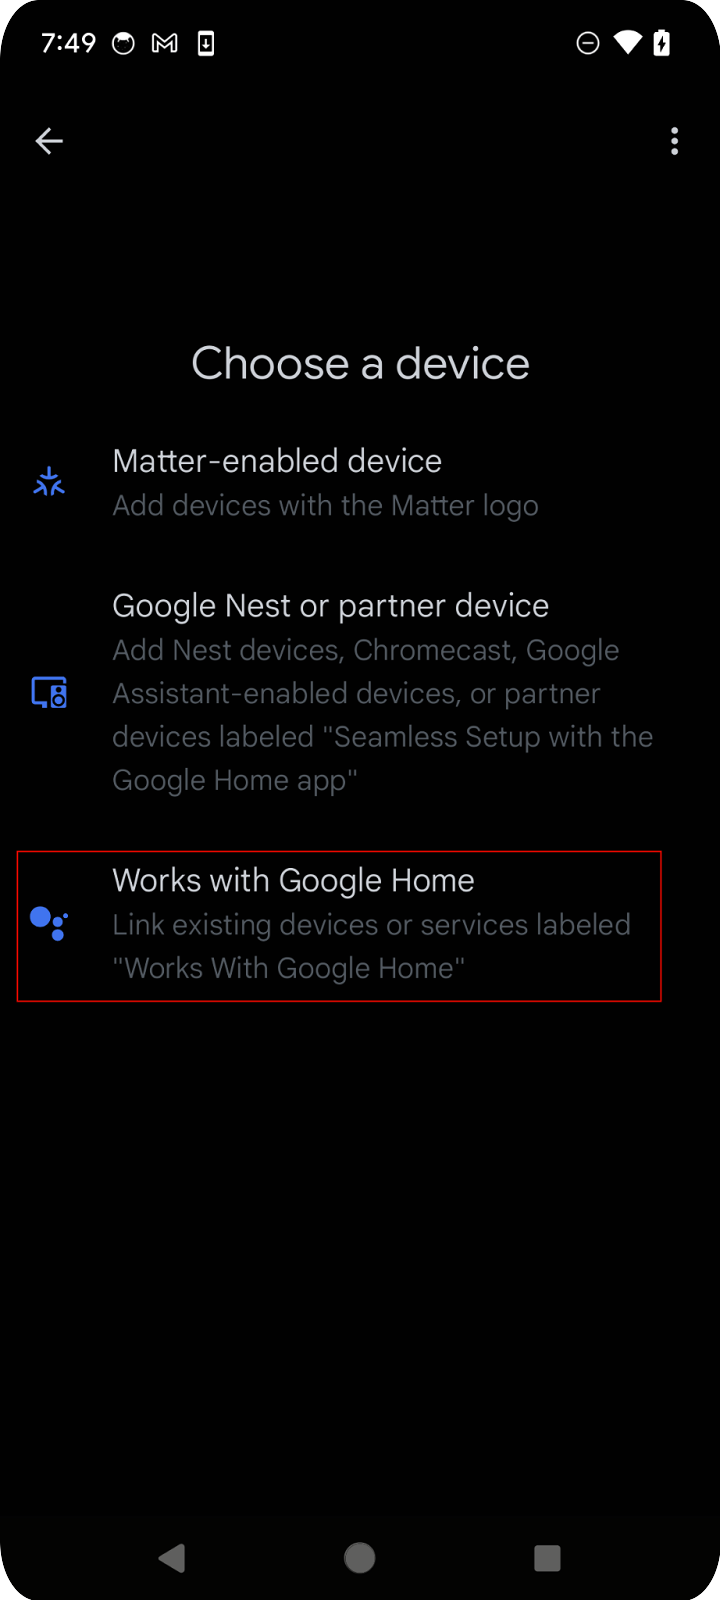
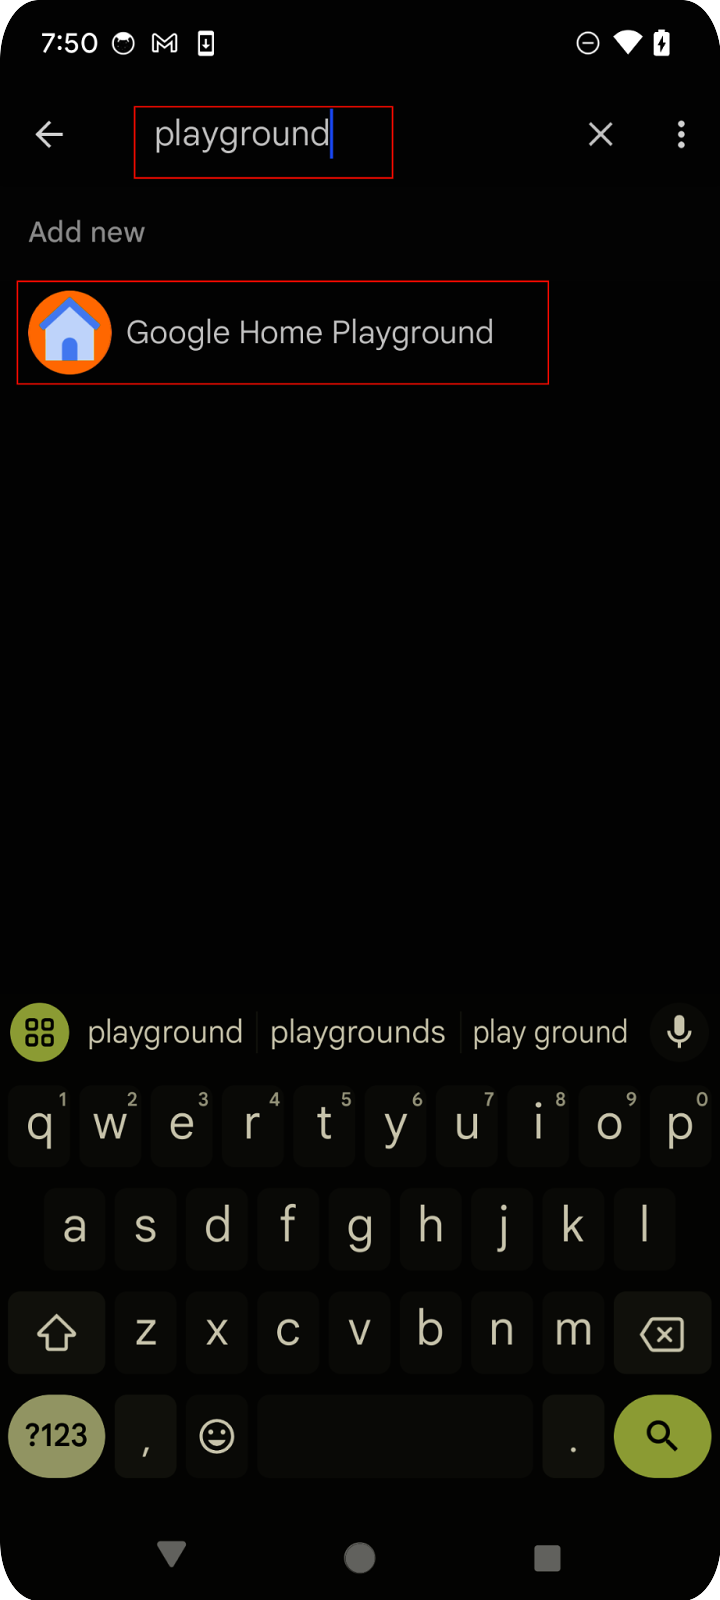
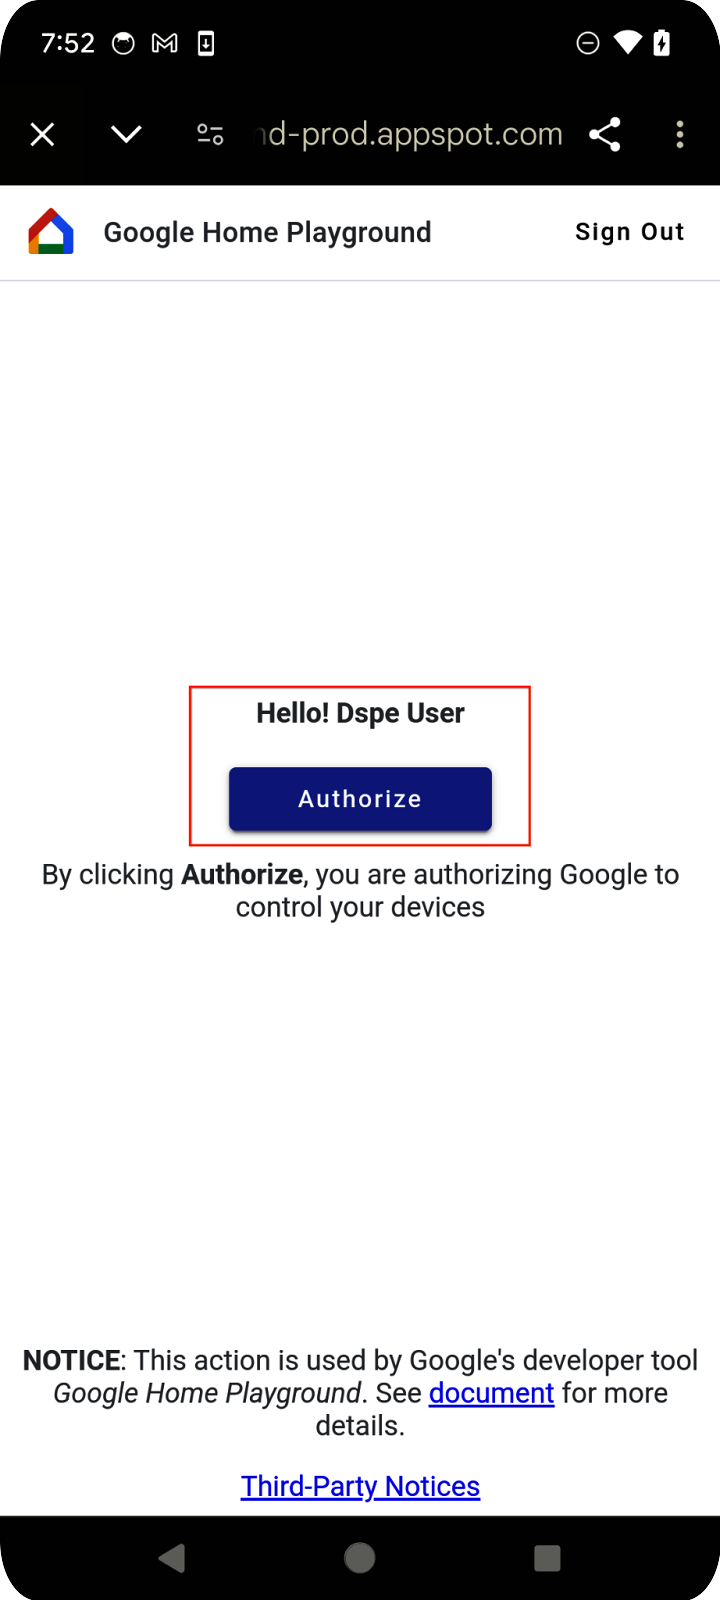
Open the Google Home app on your mobile device, tap the Add button, and select Works with Google Home. Search for "playground" in the list, then select the "Google Home Playground" project, and tap Continue.
The Google Home Playground will show you an account authorization page. Tap Authorize or Sign In with Google. You'll see all the devices you configured from the web app in the mobile app.
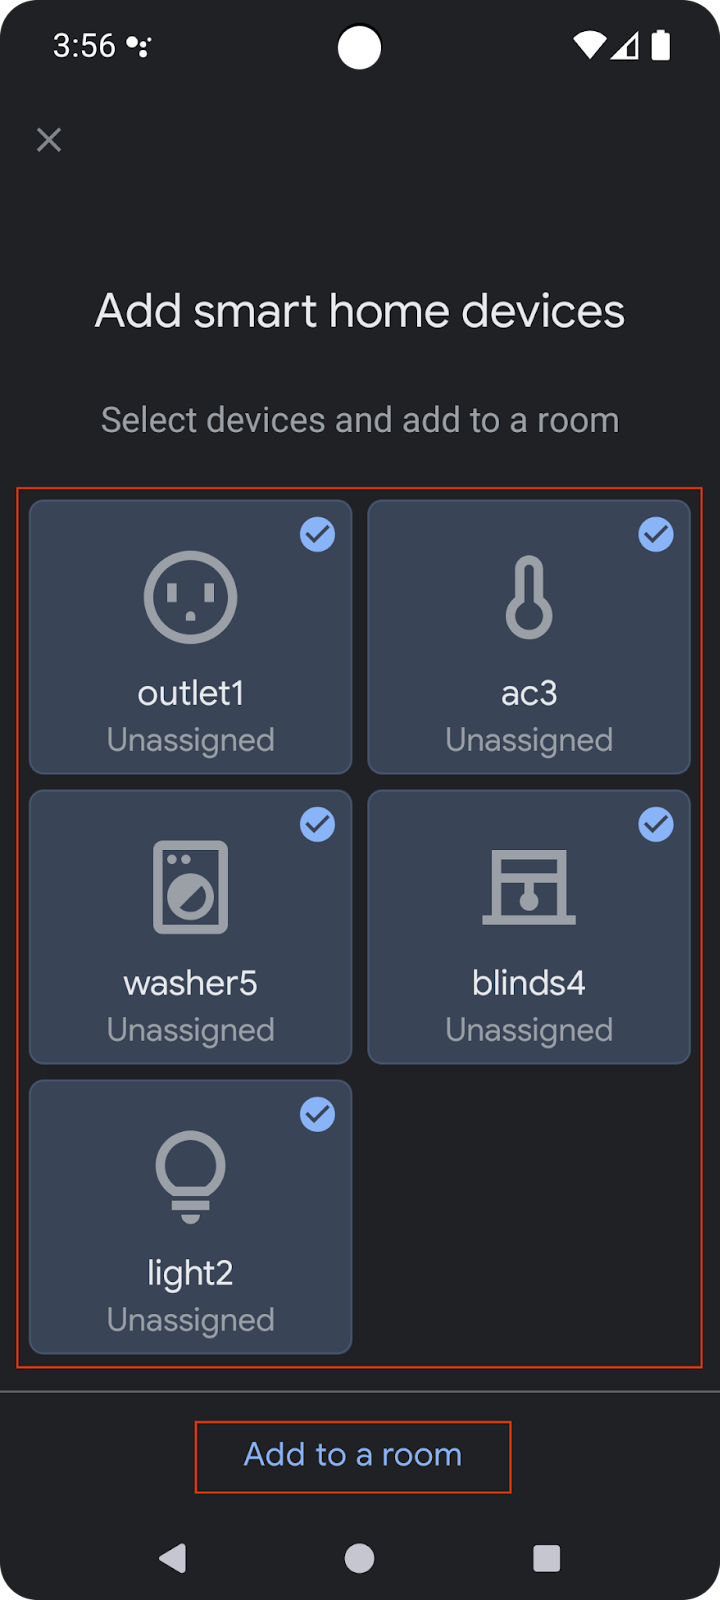
Select all the devices and complete the setup process. Returning to the Home page, you'll see all the available devices.

The supported devices in the list are now available to use with the Google Home APIs.
2. Set up your project
The following diagram illustrates the architecture of a Home APIs app:
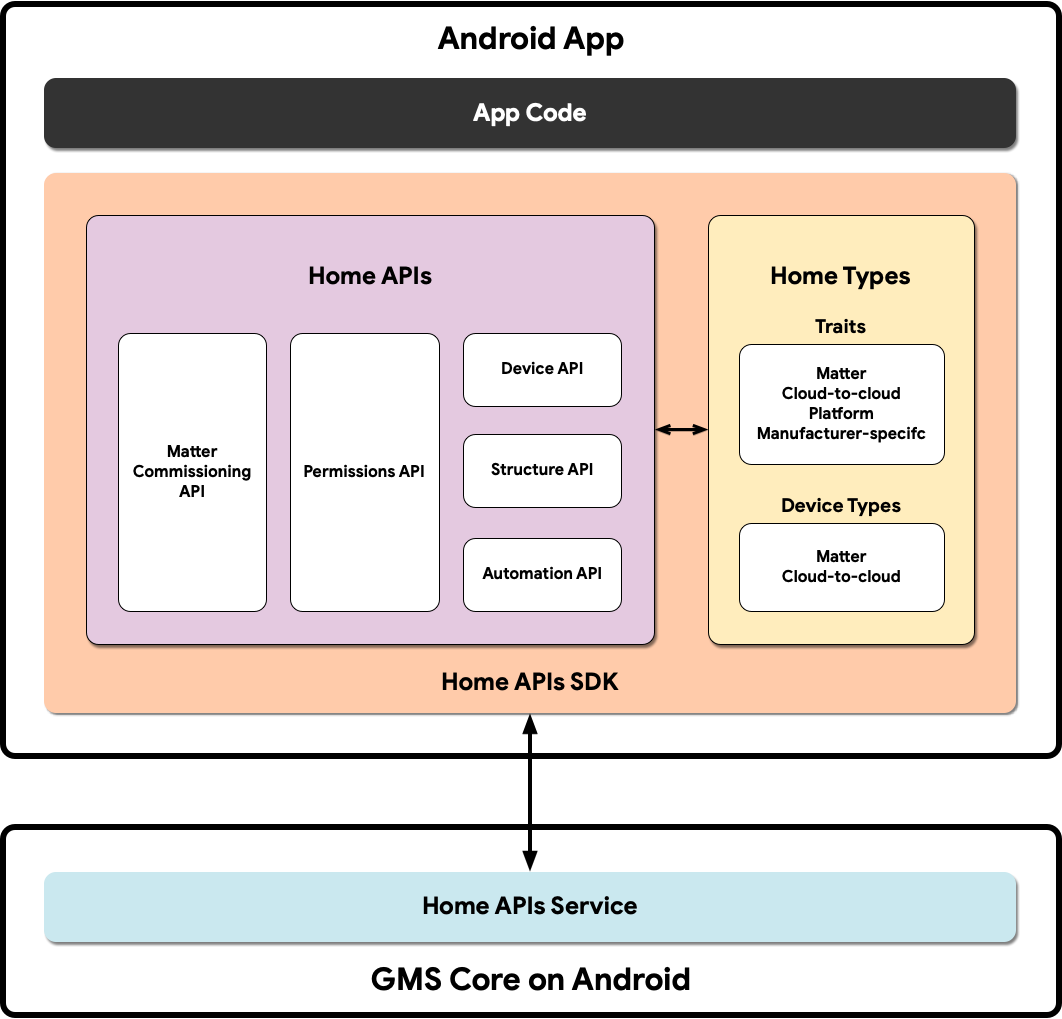
- App Code: The core code that developers work on to build the app's user interface and the logic for interacting with the Home APIs SDK.
- Home APIs SDK: The Home APIs SDK provided by Google works with the Home APIs Service in GMSCore to control smart home devices. Developers build apps that work with the Home APIs by bundling them with the Home APIs SDK.
- GMSCore on Android: GMSCore, also known as Google Play services, is a Google platform that provides core system services, enabling key functionality on all certified Android devices. The home module of Google Play services contains the services that interact with the Home APIs.
Set up the Home SDK
Follow the steps outlined in Set up the SDK to get the latest SDK.
Get the Sample App
The source code for the Sample App is available on GitHub. This codelab uses the examples from the codelab-branch-1 branch of the Sample App.
Navigate to where you want to save the project and clone the codelab-branch-1 branch:
$ git clone -b codelab-branch-1 https://github.com/google-home/google-home-api-sample-app-android.git
Build the Sample App
Perform steps 1-5 in Build the app.
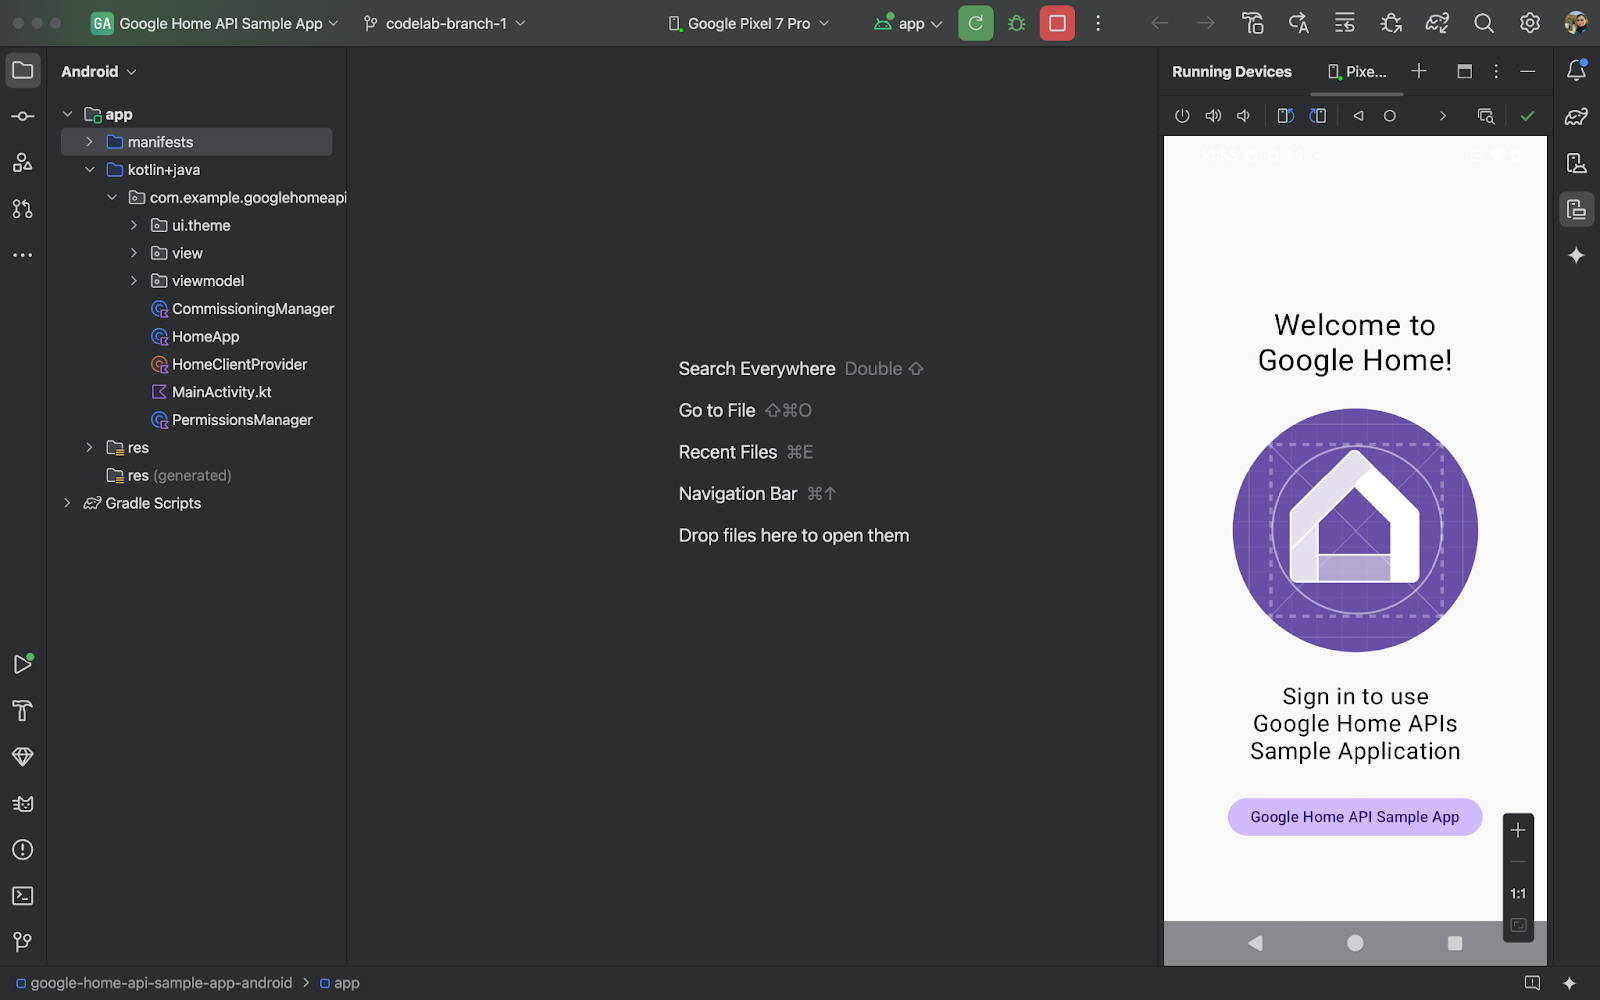
When the app is running successfully on your phone, you'll see the Sample App main page. But you won't be able to sign in until you set up OAuth authentication and implement the missing pieces using the Permission API.
3. Set up Authentication
The Home APIs use OAuth 2.0 to grant access to devices in the structure. OAuth allows a user to grant permission to an app or service without having to expose their login credentials.
Follow the instructions in Set up OAuth consent to configure the consent screen. Be sure to create at least one test account.
Then follow the instructions in Set up OAuth credentials to create the credentials for the app.
4. Initialization and Handling Permissions
In this section, you'll learn how to initialize the SDK and handle user permissions by completing the missing pieces using Permissions API.
Define Supported Types and Traits
When developing an app, you need to explicitly note which device types and traits the app will support. In the Sample App, we do this by defining static lists in the companion object in HomeApp.kt, which then can be referenced throughout the app as needed:
companion object {

  // List of supported device types by this app:
  val supportedTypes: List<DeviceTypeFactory<out DeviceType>> = listOf(
    OnOffLightDevice,
    DimmableLightDevice,

  // ...
  )
  // List of supported device traits by this app:
  val supportedTraits: List<TraitFactory<out Trait>> = listOf(
  OnOff,
  LevelControl,
  // ...
  )
}
See Supported device types and Trait Index on Android to see all supported device types and traits.
Uncomment Steps 4.1.1 and 4.1.2 in the HomeApp.kt source file to enable the source code that requests the permission.
companion object {
// List of supported device types by this app:
val supportedTypes: List<DeviceTypeFactory<out DeviceType>> = listOf(
// TODO: 4.1.1 - Non-registered device types will be unsupported
//             ContactSensorDevice,
//             ColorTemperatureLightDevice,
//             DimmableLightDevice,
//             ExtendedColorLightDevice,
//             GenericSwitchDevice,
//             GoogleDisplayDevice,
//             GoogleTVDevice,
//             OccupancySensorDevice,
//             OnOffLightDevice,
//             OnOffLightSwitchDevice,
//             OnOffPluginUnitDevice,
//             OnOffSensorDevice,
//             RootNodeDevice,
//             SpeakerDevice,
//             ThermostatDevice,
)
// List of supported device traits by this app:
val supportedTraits: List<TraitFactory<out Trait>> = listOf(
// TODO: 4.1.2 - Non-registered traits will be unsupported
//             AreaAttendanceState,
//             AreaPresenceState,
//             Assistant,
//             AssistantBroadcast,
//             AssistantFulfillment,
//             BasicInformation,
//             BooleanState,
//             OccupancySensing,
//             OnOff,
//             Notification,
//             LevelControl,
//             TemperatureControl,
//             TemperatureMeasurement,
//             Thermostat,
//             Time,
//             Volume,
        )
}
Initialize the HomeClient Object
All apps using the Home APIs initialize a HomeClient object, which is the main interface to interact with the APIs. We prepare this object in the initializer of the HomeApp (HomeApp.kt) class.
// Registry to record device types and traits used in this app:
val registry = FactoryRegistry(
  types = supportedTypes,
  traits = supportedTraits
)
// Configuration options for the HomeClient:
val config = HomeConfig(
  coroutineContext = Dispatchers.IO,
  factoryRegistry = registry
)
// Initialize the HomeClient, which is the primary object to use all Home APIs:
homeClient = Home.getClient(context = context, homeConfig = config)
First, we create a FactoryRegistry using the supported types and traits we defined earlier. Then, using this registry, we initialize a HomeConfig, which contains the configuration needed to run the APIs. Next we use the Home.getClient(...) call to acquire the HomeClient instance.
Our interactions with the Home APIs will all be through this HomeClient object.
Use the Permissions API
User authentication for the Home APIs is done through the Permissions API. The Sample App's PermissionsManager.kt source file contains code for user authentation. Uncomment the contents of the checkPermissions(...) and requestPermissions(...) functions to enable the permissions for the Sample App.
Registering:
homeClient.registerActivityResultCallerForPermissions(activity)
Launching:
try {
    val result: PermissionsResult
    result = homeClient.requestPermissions(forcePermissionFlow = ForcePermissionFlow.FORCE_LAUNCH)
    when (result.status) {
        PermissionsResultStatus.SUCCESS -> // Success Case
        PermissionsResultStatus.CANCELLED -> // User Cancelled
        PermissionsResultStatus.ERROR -> // Some Error
else -> // Unsupported Case
    }
}
catch (e: HomeException) { ... }
Checking:
try {
    val state: PermissionsState
    state = homeClient.hasPermissions().first { state ->
        state != PermissionsState.PERMISSIONS_STATE_UNINITIALIZED
    }
    when (state) {
        PermissionsState.GRANTED -> // Signed In
        PermissionsState.NOT_GRANTED -> // Not Signed In
        PermissionsState.PERMISSIONS_STATE_UNAVAILABLE -> // ...
        PermissionsState.PERMISSIONS_STATE_UNINITIALIZED -> // ...
else -> // Unsupported case
    }
}
catch (e: HomeException) { ... }
Subscribing:
       homeClient.hasPermissions().collect( { state ->
// Track the changes on state
        } )
Uncomment Step 4.3.1 in PermissionsManager.kt to enable the code that requests the permissions:
fun requestPermissions() {
    scope.launch {
    try {
// TODO: 4.3.1 - Request the permissions from the Permissions API
//                 // Request permissions from the Permissions API and record the result:
//                 val result: PermissionsResult = client.requestPermissions(forceLaunch = true)
//                 // Adjust the sign-in status according to permission result:
//                 if (result.status == PermissionsResultStatus.SUCCESS)
//                     isSignedIn.emit(true)
//                 // Report the permission result:
//                 reportPermissionResult(result)
    }
    catch (e: HomeException) { MainActivity.showError(this, e.message.toString()) }
    }
}
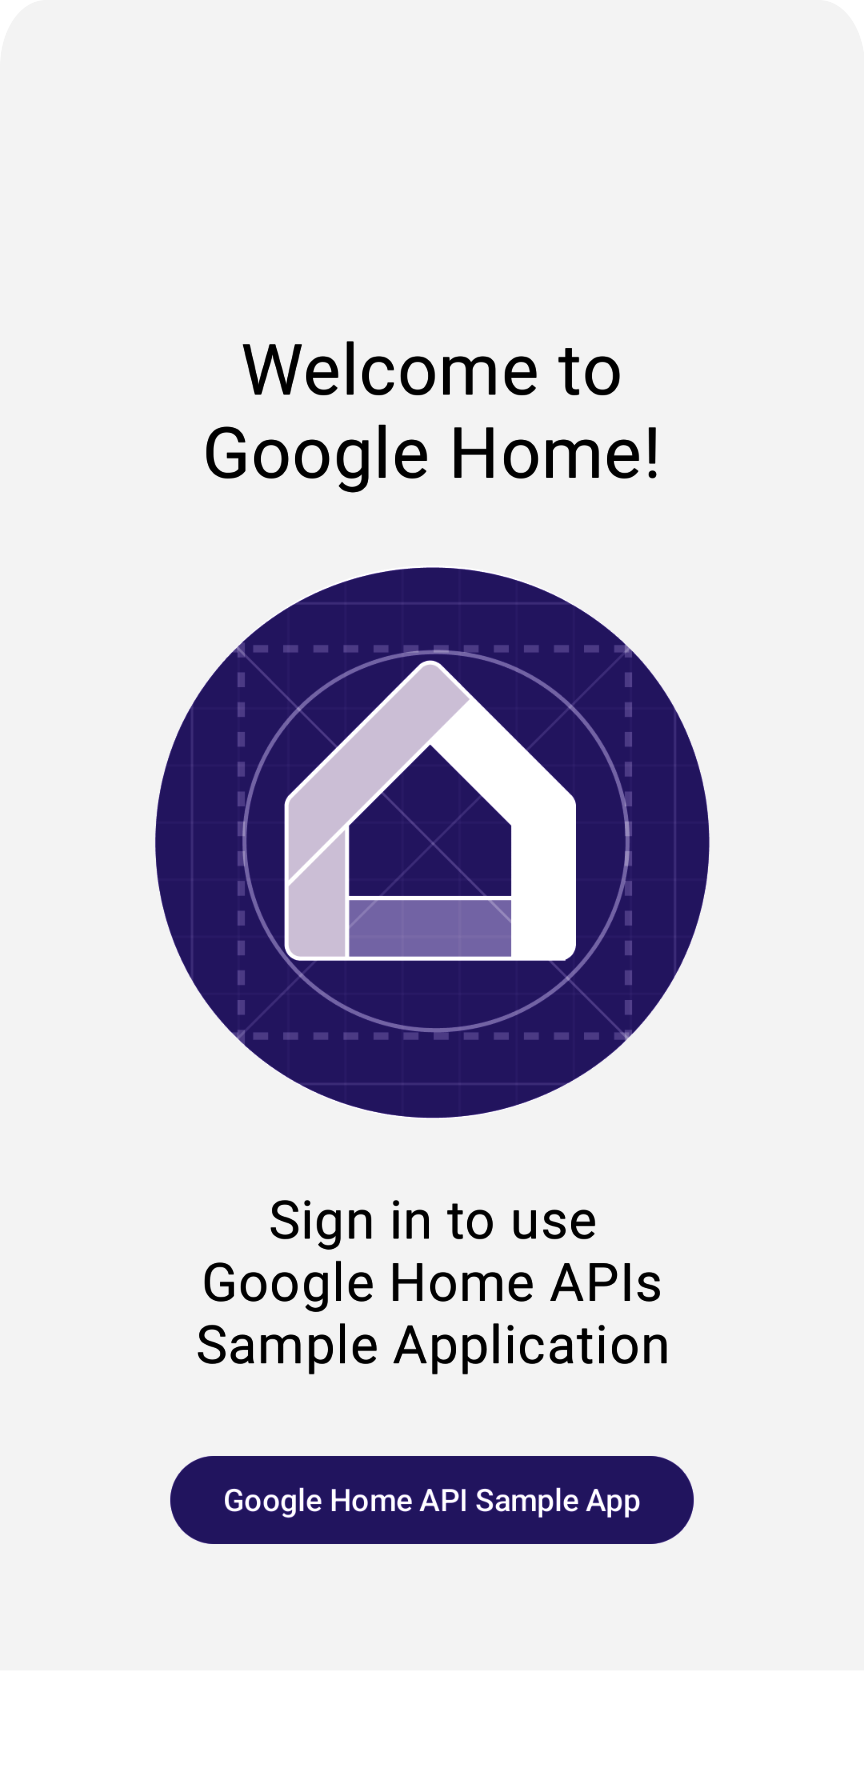
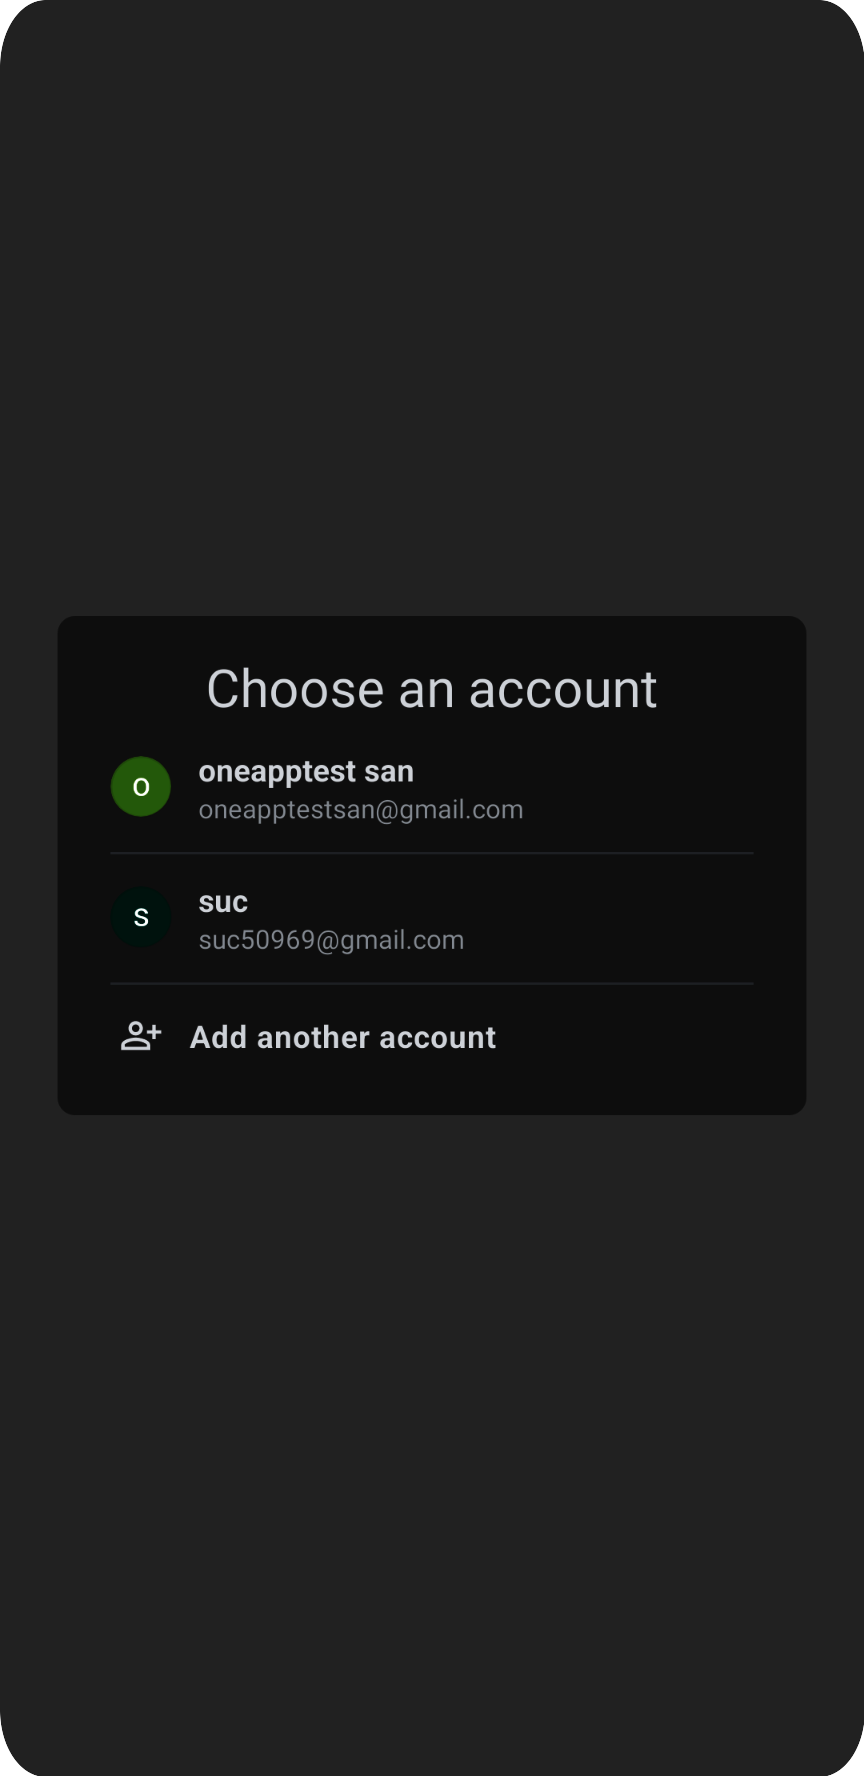
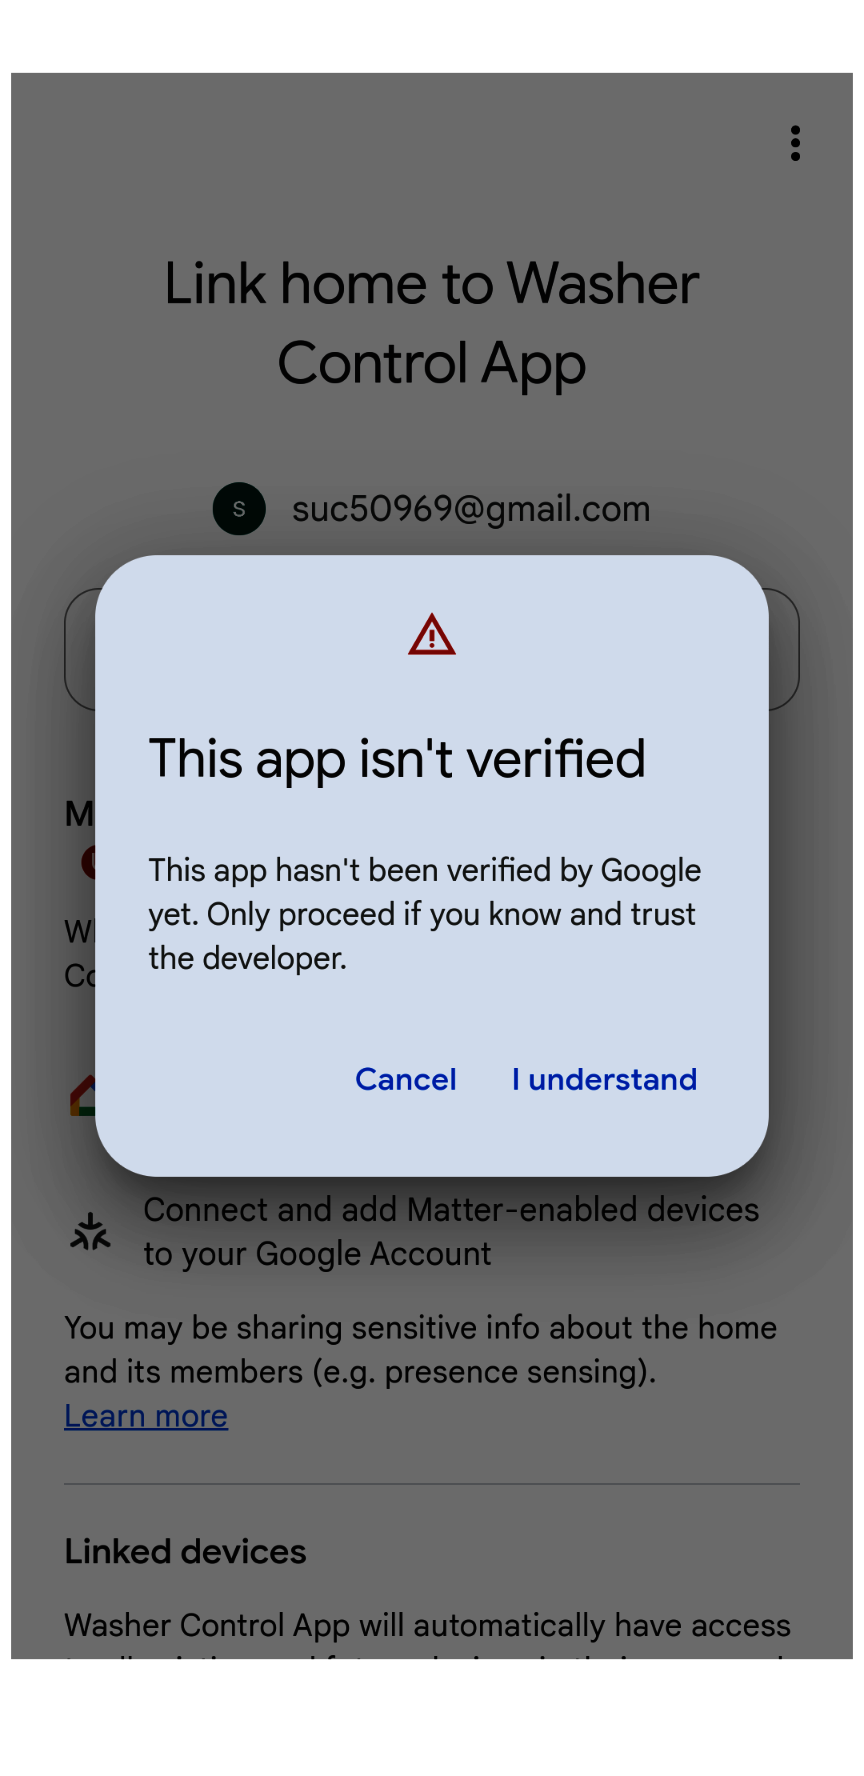
Now run the app on your phone, following the steps and allow the permissions. You should see the following flow:
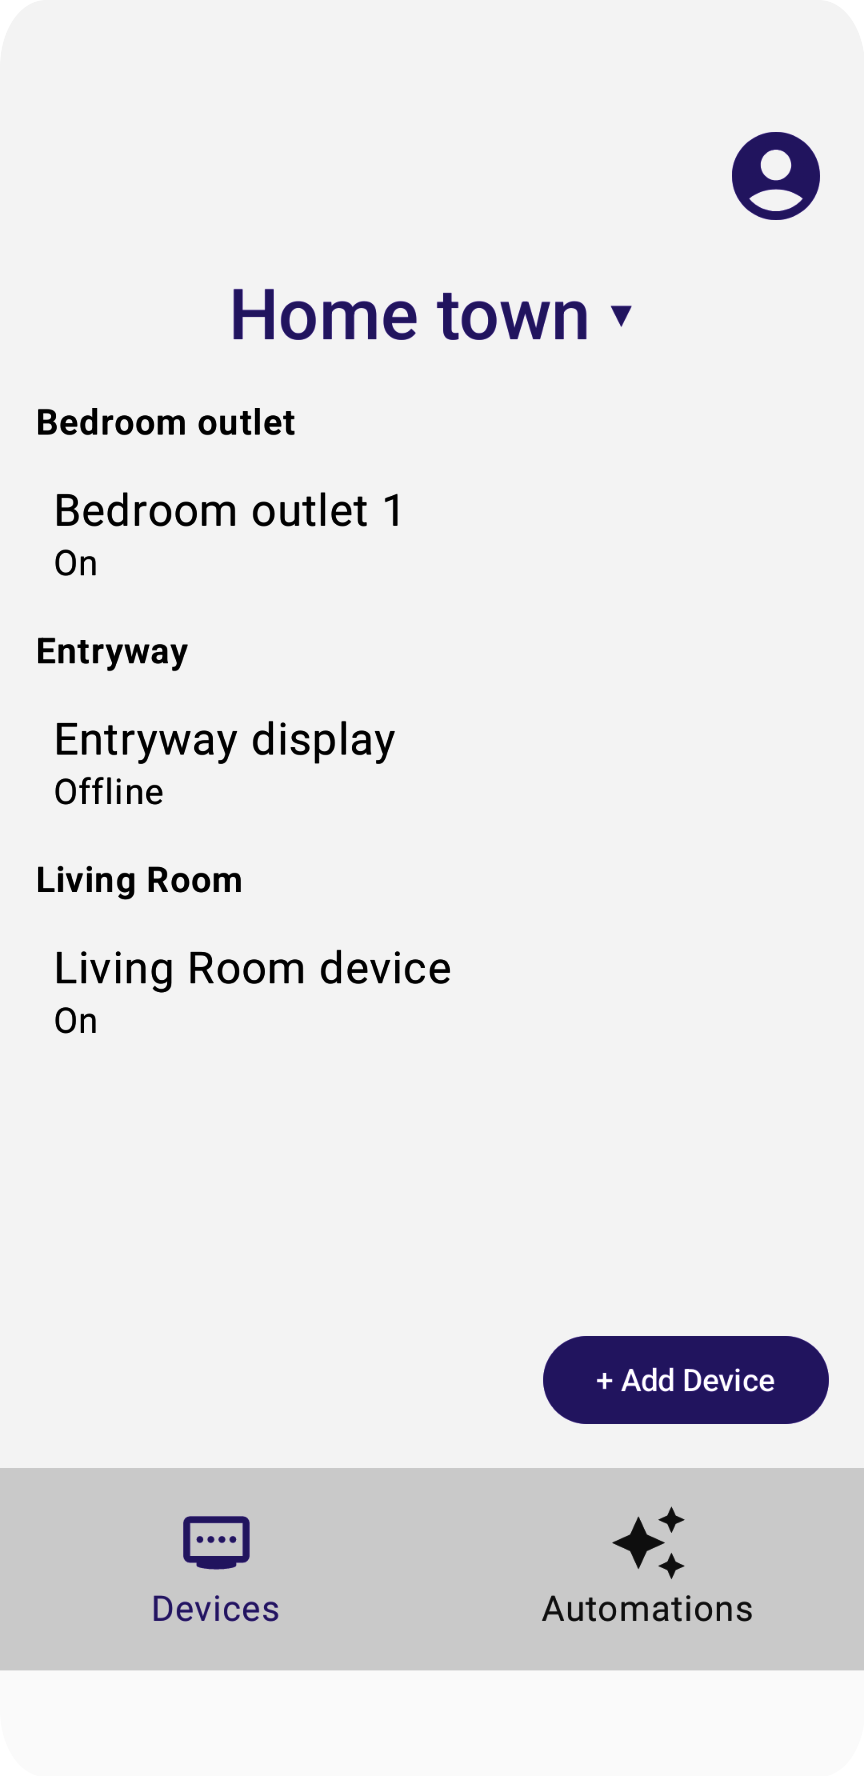
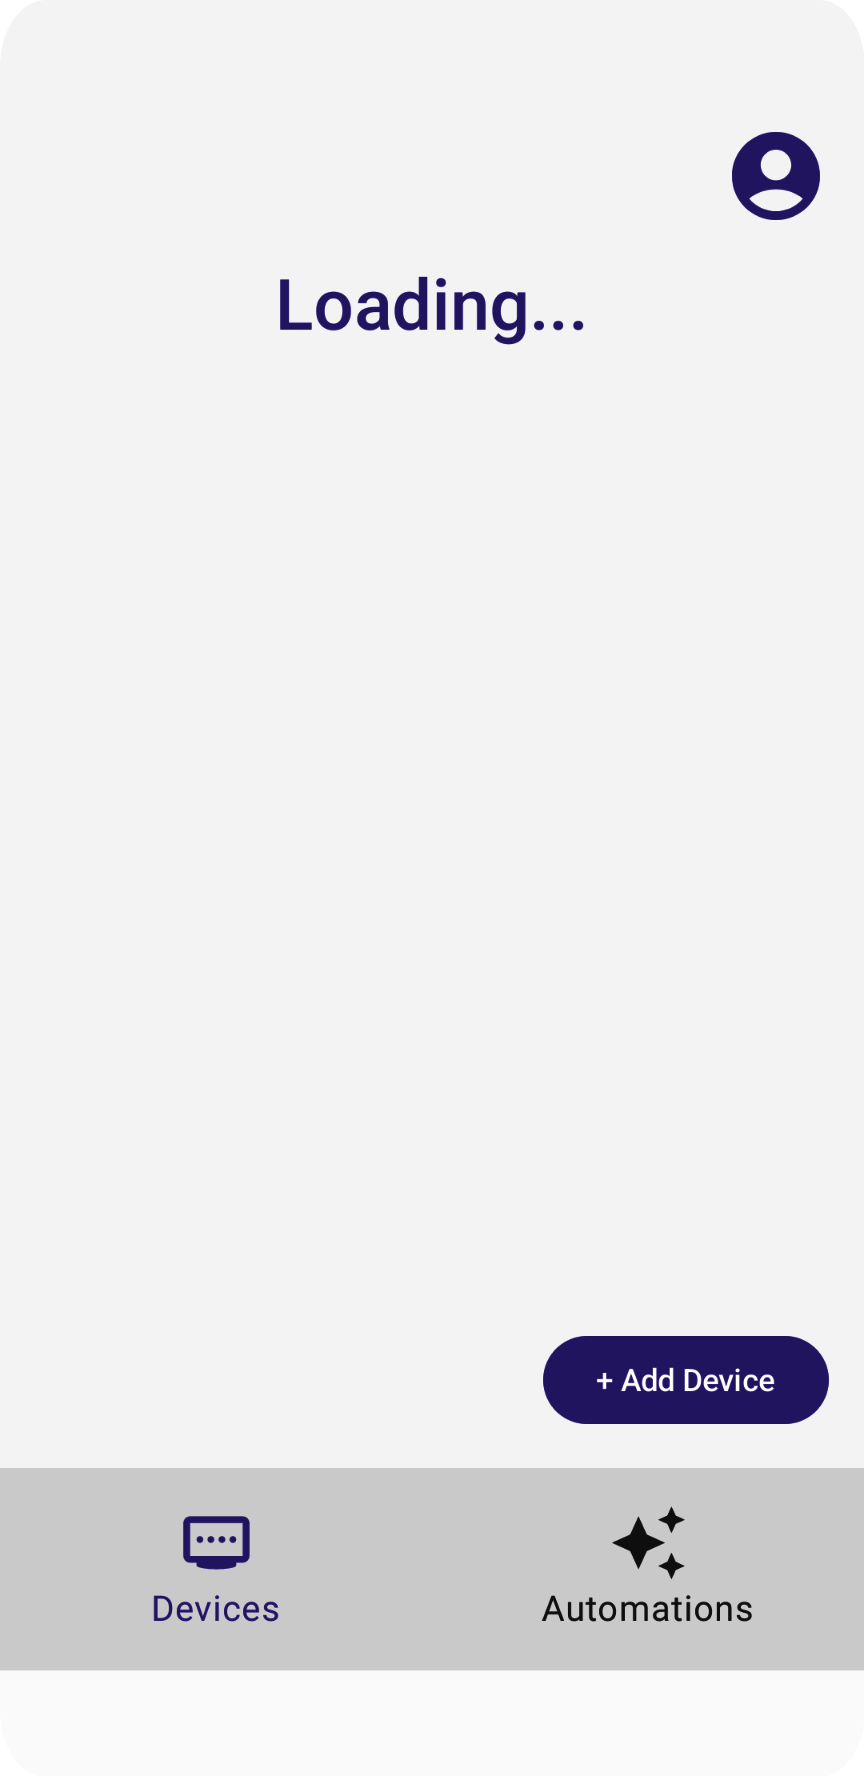
The "Loading" message never goes away, but this is because we haven't implemented the code that reads the structure and devices. We'll do that in the next section.
5. Understand the data model
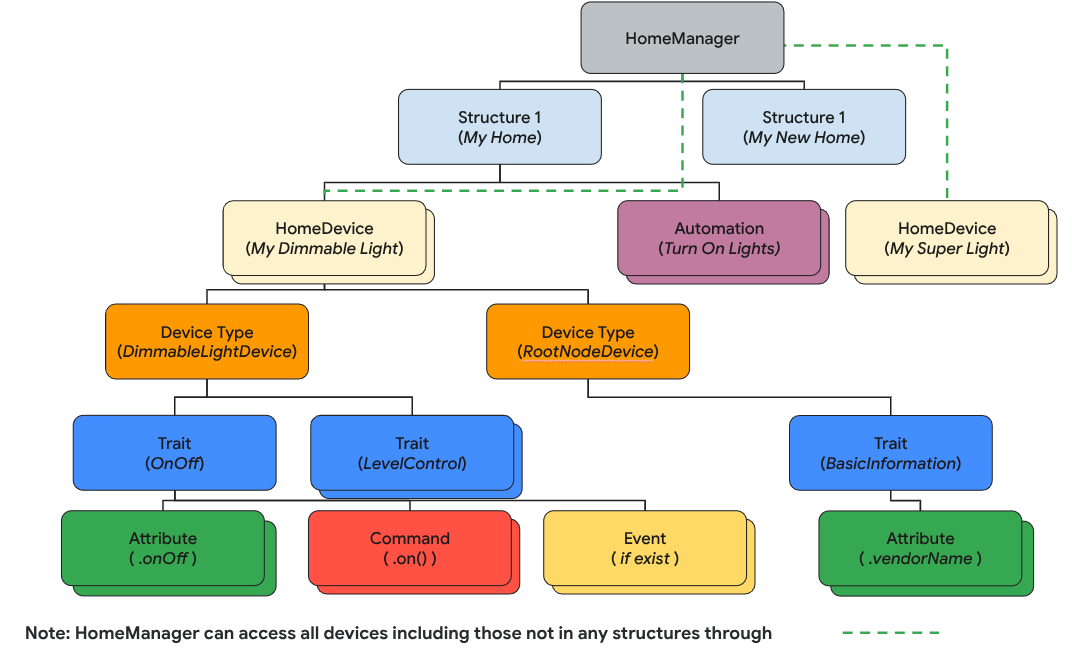
In the Home APIs, the Data Model is composed of:
Structurerepresents a home that contains rooms and devices.Roomis a part of a structure and contains devices.- Devices (defined as
HomeDevice) can be assigned to a structure (or home) or a room in structure. - Devices are composed of one or more
DeviceTypeinstances. DeviceTypeis composed ofTraitinstances.Traitis composed ofAttributeinstances (for reading/writing),Commandinstances (for controlling attributes), andEventinstances (for reading or subscribing records of past changes).Automationinstances are part of a structure and use home metadata and devices to automate tasks in the home.
In this section, you'll learn how to develop the source code to show how to use the structure API to parse and render your home structures, rooms, devices, and so forth.
Read structures
The Home APIs design is based on Kotlin Flows to stream out the data model objects (for example, Structure, HomeDevice, and so forth). Developers subscribe to a Flow to get all the objects contained in the object (for example, a Structure, a Room, and so forth).
To retrieve all the structures, call the structures() function, which returns a flow of structures. Then, call the list function on the flow to get all the structures that the user owns.
// Get the a snapshot of all structures from the current homeClient
val allStructures : Set<Structure> =
    homeClient.structures()   // HomeObjectsFlow<Structure>
    .list()                   // Set<Structure>
The Guide to app architecture strongly recommends adopting a modern Reactive programming approach to improve app data flow and state management.
Here's how the Sample App adheres to the Reactive coding style:
- View models (like
StructureViewModelandDeviceViewModel, as the state holder) subscribe to the flows from the Home APIs SDK to receive value changes, and maintain the latest states. - Views (like
StructureViewandDeviceView) subscribe to view models to receive the states and render the UI to reflect those changes. - When a user clicks a button on a view (for example, the "On" button of a light device), events trigger the view model's functions, which call the responding Home APIs functions (for example, the
OnOfftrait'sOncommand).
In Step 5.1.1 in HomeAppViewModel.kt, we subscribe to structure change events by calling the collect() function. Uncomment the section that traverses the structureSet returned by the Structures API response and delivered in the StructureViewModel's StateFlow. This allows the app to monitor structure state changes:
   private suspend fun subscribeToStructures() {
// TODO: 5.1.1 - Subscribe the structure data changes
// // Subscribe to structures returned by the Structures API:
// homeApp.homeClient.structures().collect { structureSet ->
//     val structureVMList: MutableList<StructureViewModel> = mutableListOf()
//     // Store structures in container ViewModels:
//     for (structure in structureSet) {
//         structureVMList.add(StructureViewModel(structure))
//     }
//     // Store the ViewModels:
//     structureVMs.emit(structureVMList)
//
//     // If a structure isn't selected yet, select the first structure from the list:
//     if (selectedStructureVM.value == null && structureVMList.isNotEmpty())
//         selectedStructureVM.emit(structureVMList.first())
//
// }
}
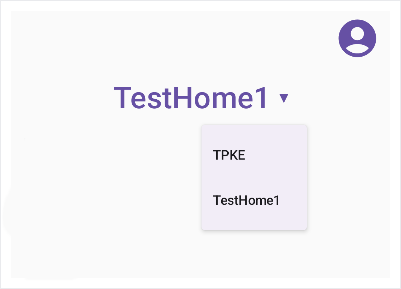
In DevicesView.kt, the app subscribes to the StructureViewModel'sStateFlow, which triggers UI recomposition when structure data changes. Uncomment the source code in Step 5.1.2 to render the structure list as a drop-down menu:
   val structureVMs: List<StructureViewModel> = homeAppVM.structureVMs.collectAsState().value
...
DropdownMenu(expanded = expanded, onDismissRequest = { expanded = false }) {
// TODO: 5.1.2 - Show list of structures in DropdownMenu
//  for (structure in structureVMs) {
//      DropdownMenuItem(
//          text = { Text(structure.name) },
//          onClick = {
//              scope.launch { homeAppVM.selectedStructureVM.emit(structure) }
//              expanded = false
//          }
//      )
//  }
}
...
Run the app again. You should see the menu when you tap the arrow:
Parse the Structure
The next step is to traverse the home objects in a structure. Retrieve the rooms from the structure:
val rooms: Set<Room>
rooms = structure.rooms().list()
You can then traverse the rooms to retrieve devices:
val devices: Set<HomeDevice>
devices = room.devices().list()
Important: In the Home APIs data model, a structure can contain devices that aren't assigned to a room, so be sure to capture the devices without rooms in your app as well:
val devicesWithoutRooms: MutableSet<HomeDevice> = mutableSetOf()

for (device in structure.devices().list())
if (device.roomId == null)
  devicesWithoutRooms.add(device)
Again, in the existing sample code, we subscribe to a flow to get the latest Room and Device list. Check the code at Steps 5.2.1 and 5.2.2 in the StructureViewModel.kt source file and uncomment it to enable the room data subscription:
val roomVMs : MutableStateFlow<List<RoomViewModel>>
val deviceVMs : MutableStateFlow<List<DeviceViewModel>>
val deviceVMsWithoutRooms : MutableStateFlow<List<DeviceViewModel>>
private suspend fun subscribeToRooms() {
// TODO: 5.2.1 - Subscribe the room data changes
//   // Subscribe to changes on rooms:
//   structure.rooms().collect { roomSet ->
//       val roomVMs = mutableListOf<RoomViewModel>()
//       // Store rooms in container ViewModels:
//       for (room in roomSet) {
//           roomVMs.add(RoomViewModel(room))
//       }
//       // Store the ViewModels:
//       this.roomVMs.emit(roomVMs)
//   }
}
private suspend fun subscribeToDevices() {
// TODO: 5.2.2 - Subscribe the device data changes in a structure
//   // Subscribe to changes on devices:
//   structure.devices().collect { deviceSet ->
//       val deviceVMs = mutableListOf<DeviceViewModel>()
//       val deviceWithoutRoomVMs = mutableListOf<DeviceViewModel>()
//       // Store devices in container ViewModels:
//       for (device in deviceSet) {
//           val deviceVM = DeviceViewModel(device)
//           deviceVMs.add(deviceVM)
//           // For any device that's not in a room, additionally keep track of a separate list:
//           if (device.roomId == null)
//               deviceWithoutRoomVMs.add(deviceVM)
//       }
//       // Store the ViewModels:
//       this.deviceVMs.emit(deviceVMs)
//       deviceVMsWithoutRooms.emit(deviceWithoutRoomVMs)
//   }
    }
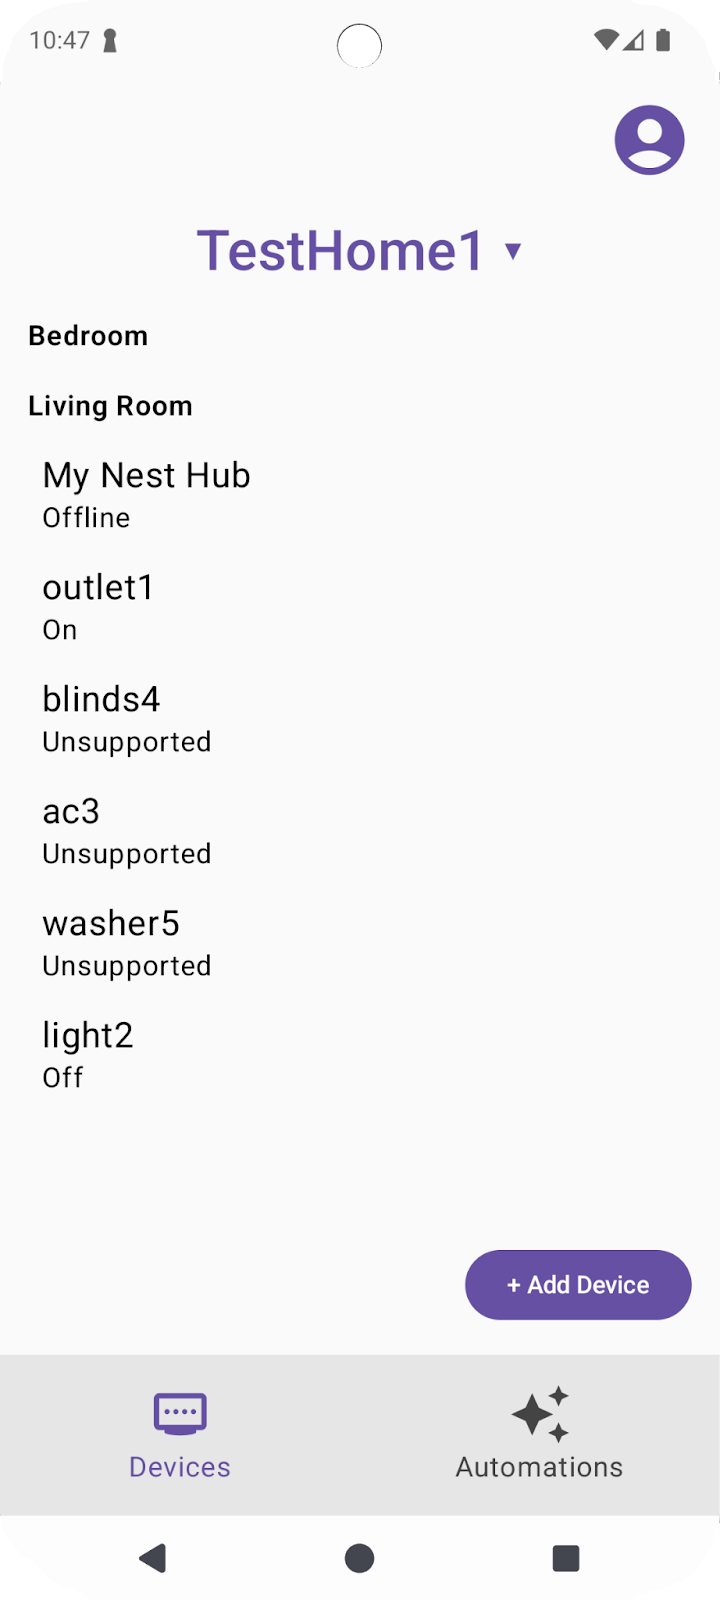
Uncomment Steps 5.2.3 and 5.2.4 in the DevicesView.kt source file to render the room list as a menu:
val selectedRoomVMs: List<RoomViewModel> =
selectedStructureVM.roomVMs.collectAsState().value
...
for (roomVM in selectedRoomVMs) {
// TODO: 5.2.3 - Render the list of rooms
//   RoomListItem(roomVM)
// TODO: 5.2.4 - Render the list of devices in a room
//   val deviceVMsInRoom: List<DeviceViewModel> = roomVM.deviceVMs.collectAsState().value
//
//   for (deviceVM in deviceVMsInRoom) {
//       DeviceListItem(deviceVM, homeAppVM)
//   }
}
Now that you have the devices, we'll learn how to work with them.
6. Work with Devices
The Home APIs use a HomeDevice object to capture the device and its capabilities. Developers can subscribe to device attributes and use them to represent smart home devices in their apps.
Read device states
The HomeDevice object presents a set of static values, such as the device name or the connectivity state. As a developer, you can retrieve these soon after you get the device from the APIs:
val id: String = device.id.id
val name: String = device.name
val connectivity: ConnectivityState =
    device.sourceConnectivity.connectivityState
In order to get the device capabilities, you need to retrieve the types and traits from the HomeDevice. To do this, you can subscribe to the device type flow as follows, and retrieve the traits from the device types:
device.types().collect { typeSet ->
var primaryType : DeviceType = UnknownDeviceType()
for (typeInSet in typeSet)
if (typeInSet.metadata.isPrimaryType)
                    primaryType = typeInSet
            val traits: List<Trait> = mutableListOf()
for (trait in primaryType.traits())
if (trait.factory in myTraits)
                    traits.add(trait)
for (trait in traits)
                parseTrait(trait, primaryType)
        }
Each device contains a set of supported DeviceType (bundled capabilities), which you can retrieve using device.types(). These device types contain traits that can be retrieved using type.traits(). Every device marks one of its types as the primary type (which can be checked using type.metadata.isPrimaryType) that you should represent in your app. To provide a complete experience to users, we recommend traversing all returned types and integrating all traits available to you.
Once you retrieve a trait, you can parse it using a function like the following to interpret the values:
fun <T : Trait?> parseTrait(trait : T, type: DeviceType) {
    val status : String = when (trait) {
        is OnOff -> { if (trait.onOff) "On" else "Off" }
        is LevelControl -> { trait.currentLevel.toString() }
        is BooleanState -> {
            when (type.factory) {
                ContactSensorDevice -> {
if (trait.stateValue) "Closed"
else "Open"
                }
else -> ...
            }
        }
else -> ...
    }
}
Note that there can be variations in what a trait represents, depending on the device type featuring it (see BooleanState in the preceding example), so you need to be aware of the context of each device type to understand what their traits really represent.
Uncomment Steps 6.1.1 and 6.1.2 in the DeviceViewModel.kt source file to retrieve the states:
private suspend fun subscribeToType() {
// Subscribe to changes on device type, and the traits/attributes within:
device.types().collect { typeSet ->
// Container for the primary type for this device:
var primaryType : DeviceType = UnknownDeviceType()
...
// TODO: 6.1.1 - Determine the primary type for this device
//       // Among all the types returned for this device, find the primary one:
//       for (typeInSet in typeSet)
//           if (typeInSet.metadata.isPrimaryType)
//               primaryType = typeInSet
//
//       // Optional: For devices with a single type that did not define a primary:
//       if (primaryType is UnknownDeviceType && typeSet.size == 1)
//           primaryType = typeSet.first()
// Container for list of supported traits present on the primary device type:
val supportedTraits: List<Trait> = getSupportedTraits(primaryType.traits())
...
}
fun getSupportedTraits(traits: Set<Trait>) : List<Trait> {
           val supportedTraits: MutableList<Trait> = mutableListOf()
// TODO: 6.1.2 - Get only the supported traits for this device
//   for (trait in traits)
//       if (trait.factory in HomeApp.supportedTraits)
//           supportedTraits.add(trait)
return supportedTraits
}
Uncomment Step 6.1.3 in DeviceView.kt to render an OnOff trait, including its name and status, as a String:
Box (Modifier.padding(horizontal = 24.dp, vertical = 8.dp)) {
when (trait) {
is OnOff -> {
// TODO: 6.1.3 - Render controls based on the trait type
// Column (Modifier.fillMaxWidth()) {
//     Text(trait.factory.toString(), fontSize = 20.sp)
//     Text(DeviceViewModel.getTraitStatus(trait, type), fontSize = 16.sp)
// }
...
}
is LevelControl -> {
      ...
  }
   is BooleanState -> {
      ...
  }
   is OccupancySensing -> {
      ...
  }
  ...
}
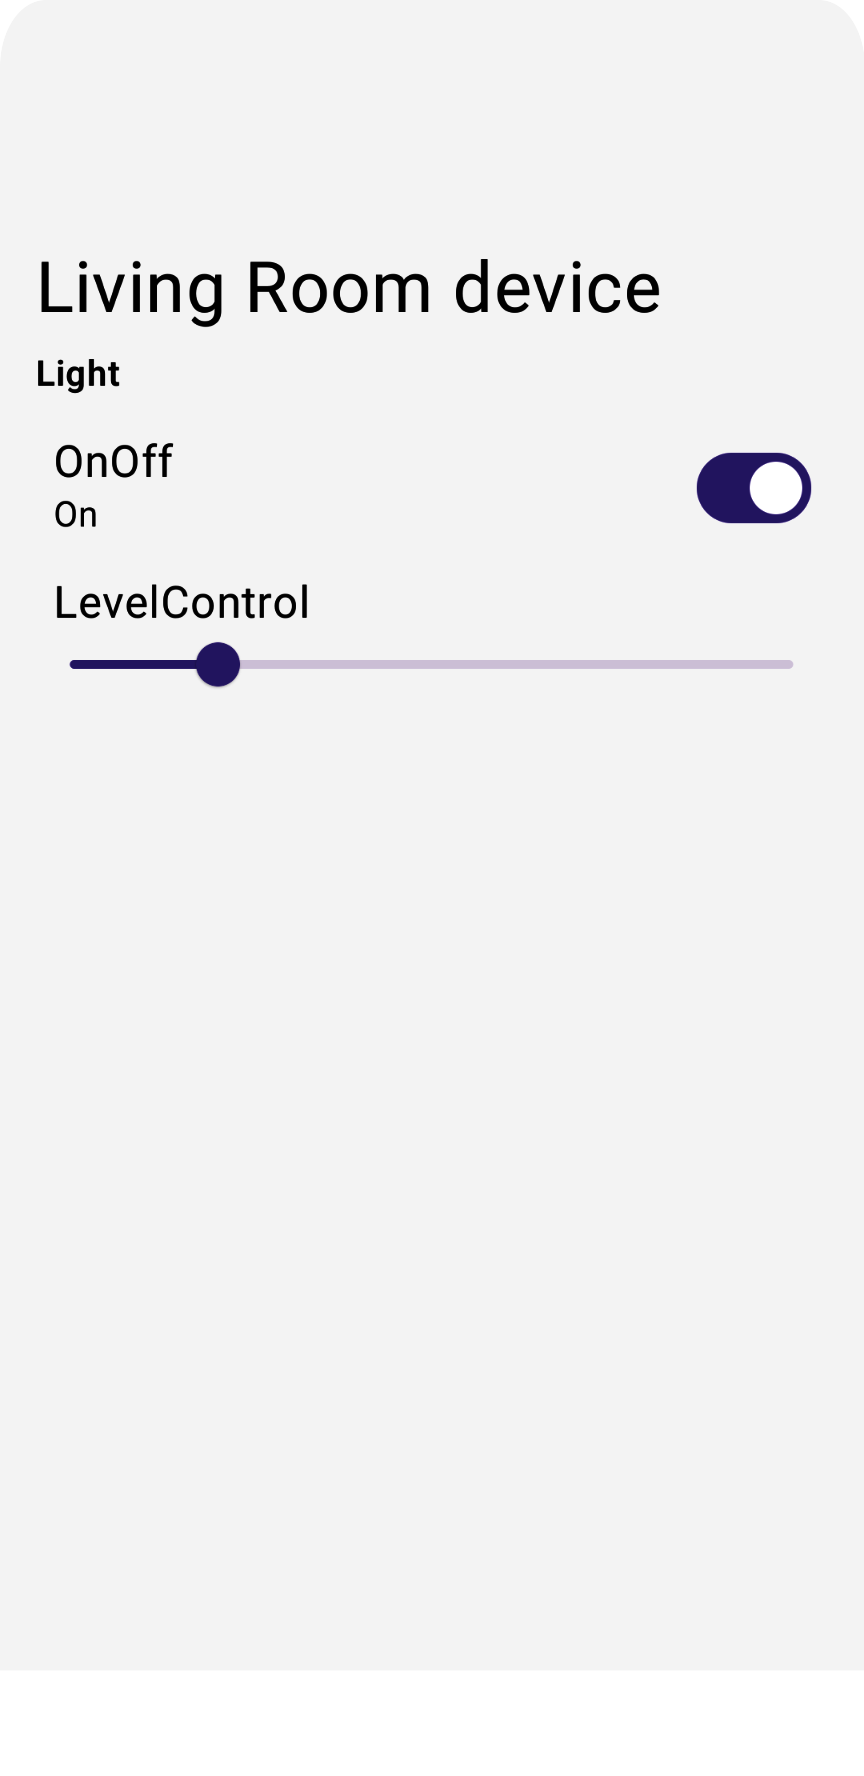
If you run the app now with supported device types (for example a Light device), it should show the up-to-date states for all the devices.
Issue device commands
To issue commands to devices, the Home APIs provide convenience functions on Trait objects such as trait.on() or trait.moveToLevel(...):
fun <T : Trait?> issueCommand(trait : T) {
     when (trait) {
         is OnOff -> {
// trait.on()
// trait.off()
   }
   is LevelControl -> {
// trait.moveToLevel(...)
// trait.moveToLevelWithOnOff(...)
        }
    }
}
Tip: Once you determine the type of the trait, use the Android Studio's auto-complete feature to see what kind of actions are available for interacting with the trait.
Uncomment Step 6.2.1 in DeviceView.kt to add functional controls in the app:
Box (Modifier.padding(horizontal = 24.dp, vertical = 8.dp)) {
when (trait) {
is OnOff -> {
                ....
// TODO: 6.2.1 - Render controls based on the trait type
//   Switch (checked = (trait.onOff == true), modifier = Modifier.align(Alignment.CenterEnd),
//       onCheckedChange = { state ->
//           scope.launch { if (state) trait.on() else trait.off() }
//       },
//       enabled = isConnected
//   )
}
If you run the app now, it should allow you to control real-life physical devices.
If you tap the OnOff control on your lightbulb, the device should now come on.
For more information about how to control devices, see Control devices on Android.
7. Commission devices
The Commissioning API lets developers add devices to the Google Home ecosystem, and make them available to control using the Home APIs. Only Matter devices are supported. In this section we will explore how you can enable device commissioning in your apps.
Before starting this section, make sure the following prerequisites are met:
- A Google Hub supporting Matter located in the same network as your Android phone has been added to your Google Home app.
- You've created a developer project on the Google Home Developer Console with the VID
0xFFF1and the PID0x8000.
If you have a physical Matter device with a QR code for commissioning, you can skip ahead to Enable commissioning API. Otherwise, continue on to the next section, where we discuss how you can use the Matter Virtual Device app (MVD) to create commissionable virtual devices.
Optional: Prepare a Matter commissionable device
The simplest way to prepare a Matter commissionable device is using an emulated device provided by the Matter Virtual Device app (MVD).
After installing the MVD and setting up the firewall, run the MVD:
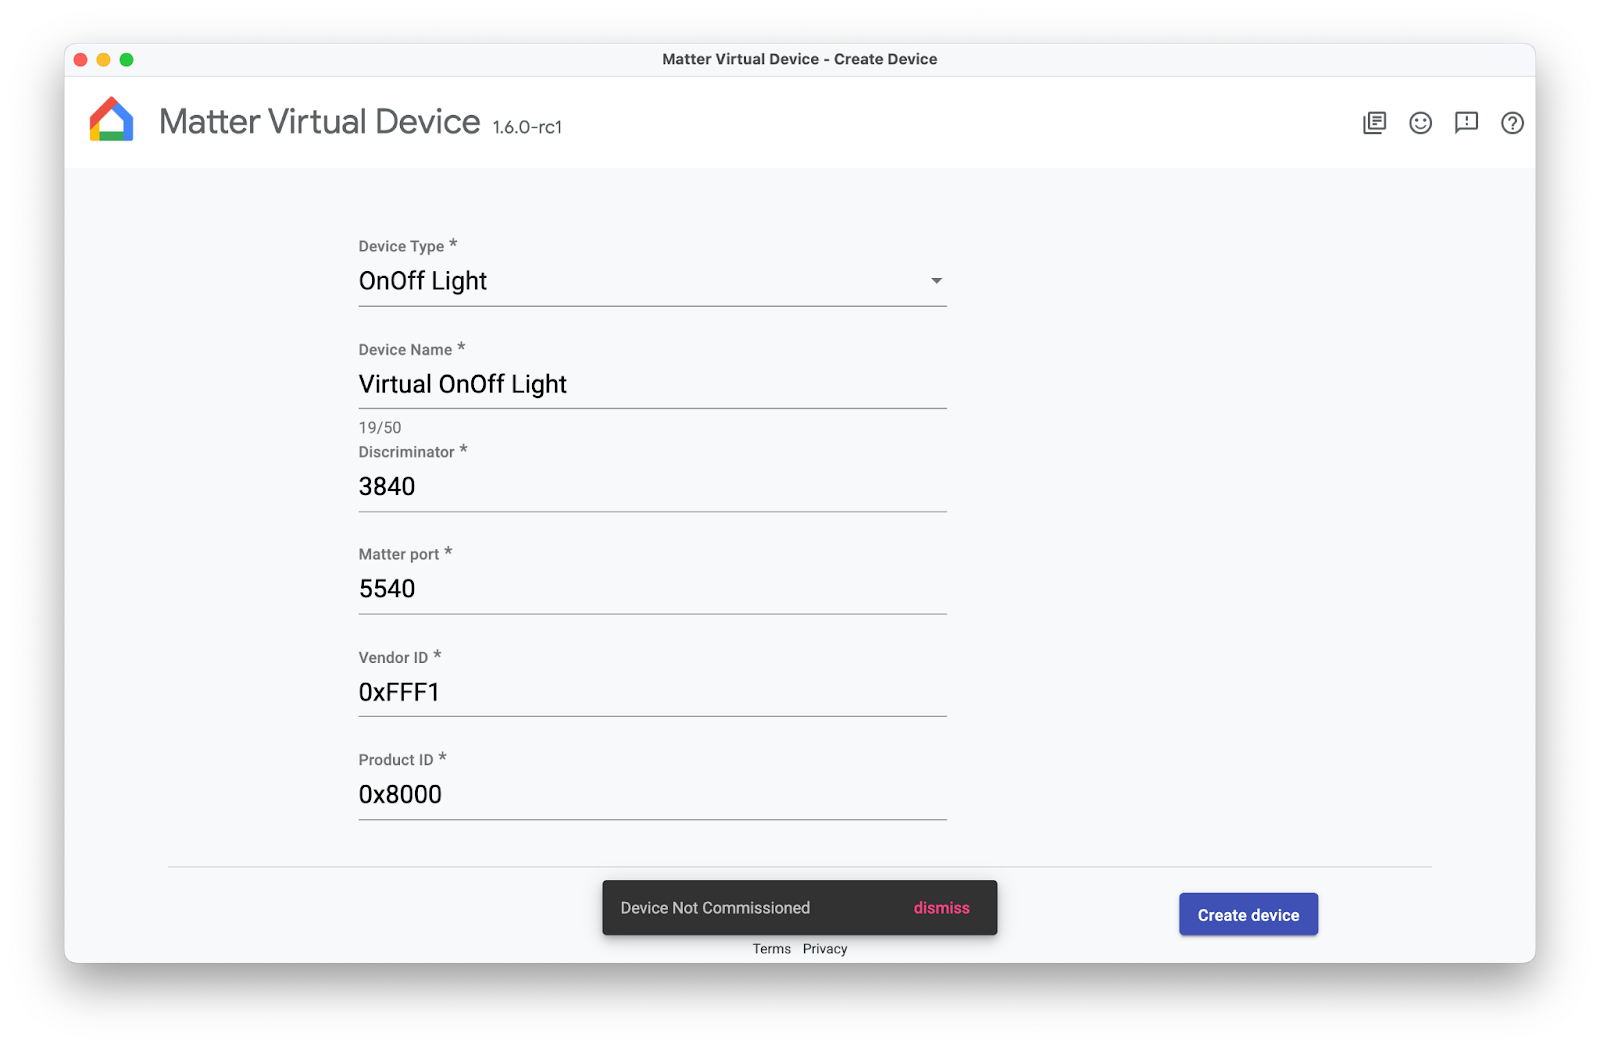
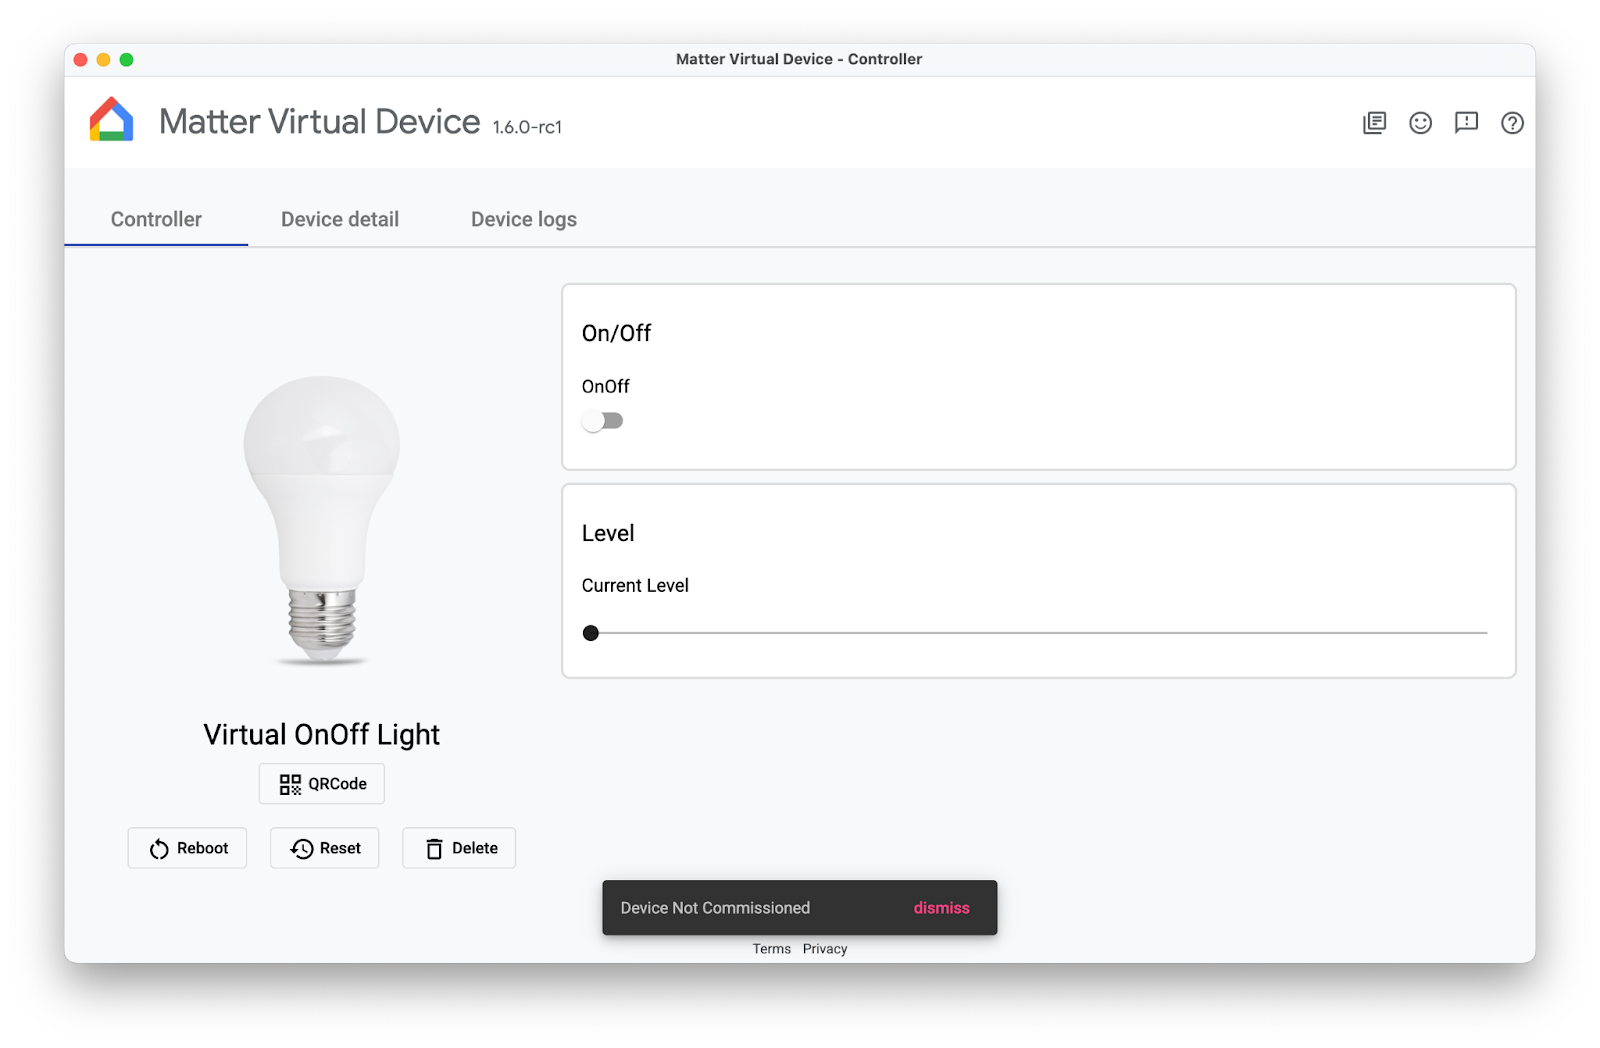
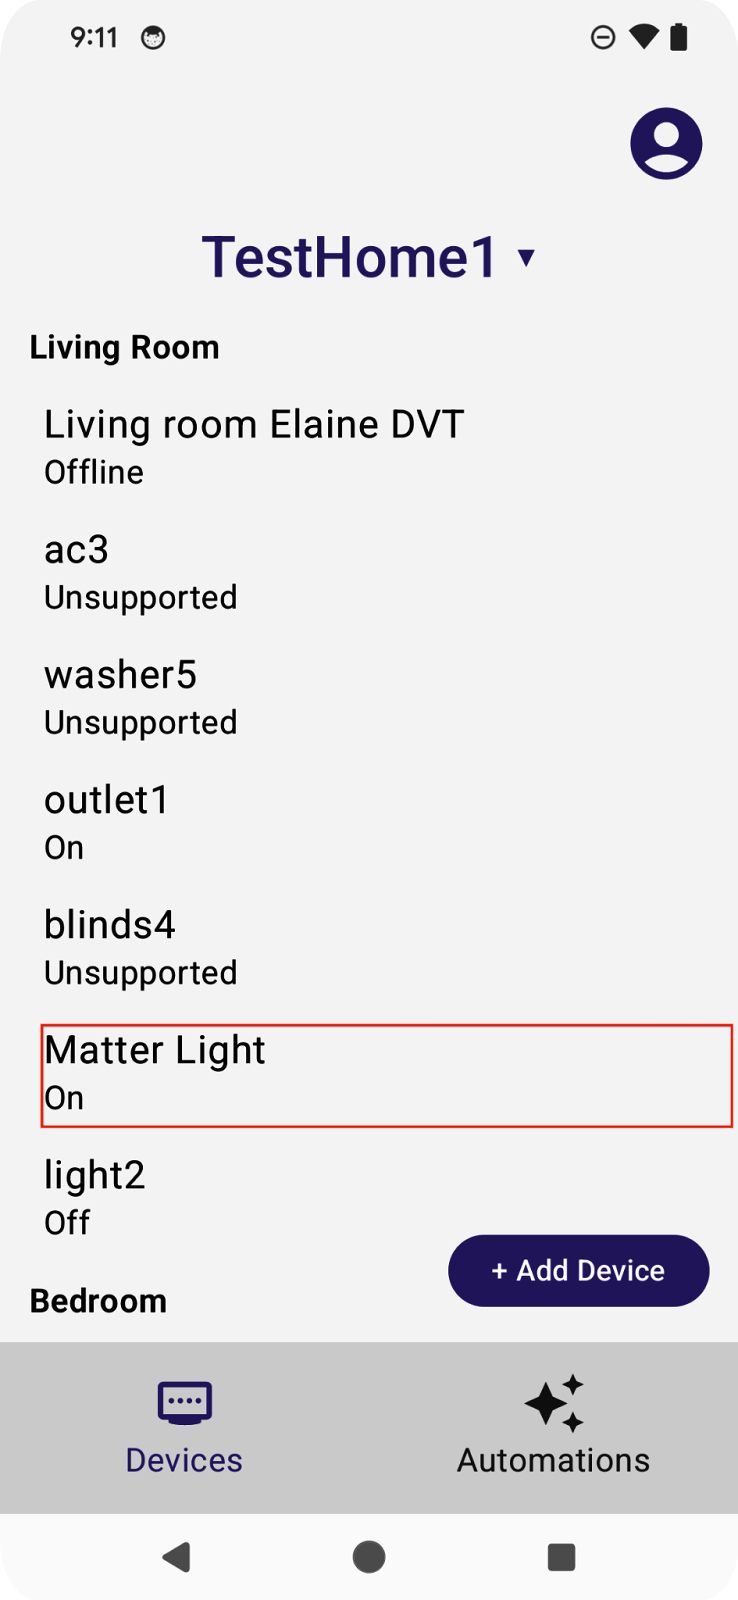
Create an OnOff device. Notice that it hasn't been commissioned yet - you'll commission it later in this codelab.
Enable the Commissioning API
The Commissioning API works outside of the app's Activity, so commissioning needs to be handled differently than the other Home APIs. In order to get your app ready for commissioning, you need two variables.
One variable is ActivityResultLauncher, which is used to send the commissioning intent and to manage the result callback. The other variable is CommissioningResult, which is the object used to store the commissioning result. See the following example for how to set up commissioning:
var launcher: ActivityResultLauncher<IntentSenderRequest>
lateinit var commissioningResult: CommissioningResult?
launcher = activity.registerForActivityResult(StartIntentSenderForResult()) { result ->
try {
  commissioningResult = CommissioningResult.fromIntentSenderResult(
      result.resultCode, result.data)
  } catch (exception: ApiException) {
// Catch any issues
 }
}
Once your commissioning flow is set up, you'll build your commissioning intent, and launch it using the launcher we created in the preceding example. We recommend placing the intent and the launcher in a dedicated function like the following. A dedicated function can be tied to a UI element (such as an +Add Device button) and invoked based on the user request:
fun requestCommissioning() {
// Retrieve the onboarding payload used when commissioning devices:
val payload = activity.intent?.getStringExtra(Matter.EXTRA_ONBOARDING_PAYLOAD)
  scope.launch {
    // Create a commissioning request to store the device in Google's Fabric:
    val request = CommissioningRequest.builder()
      .setStoreToGoogleFabric(true)
      .setOnboardingPayload(payload)
      .build()
    // Initialize client and sender for commissioning intent:
    val client: CommissioningClient = Matter.getCommissioningClient(context)
    val sender: IntentSender = client.commissionDevice(request).await()
    // Launch the commissioning intent on the launcher:
    launcher.launch(IntentSenderRequest.Builder(sender).build())
  }
}
Uncomment Step 7.1.1 in CommissioningManager.kt to enable the commissioning capability and make the +Add Device button work in the Sample App.
// Called by +Add Device button in DeviceView.kt
fun requestCommissioning() {
// Retrieve the onboarding payload used when commissioning devices:
val payload = activity.intent?.getStringExtra(Matter.EXTRA_ONBOARDING_PAYLOAD)
// TODO: 7.1.1 - Launch the commissioning intent
// scope.launch {
//     // Create a commissioning request to store the device in Google's Fabric:
//     val request = CommissioningRequest.builder()
//         .setStoreToGoogleFabric(true)
//         .setOnboardingPayload(payload)
//         .build()
//     // Initialize client and sender for commissioning intent:
//     val client: CommissioningClient = Matter.getCommissioningClient(context)
//     val sender: IntentSender = client.commissionDevice(request).await()
//     // Launch the commissioning intent on the launcher:
//     launcher.launch(IntentSenderRequest.Builder(sender).build())
// }
}
Running this function should start the Commissioning Flow, which should display a screen resembling the following screenshot:
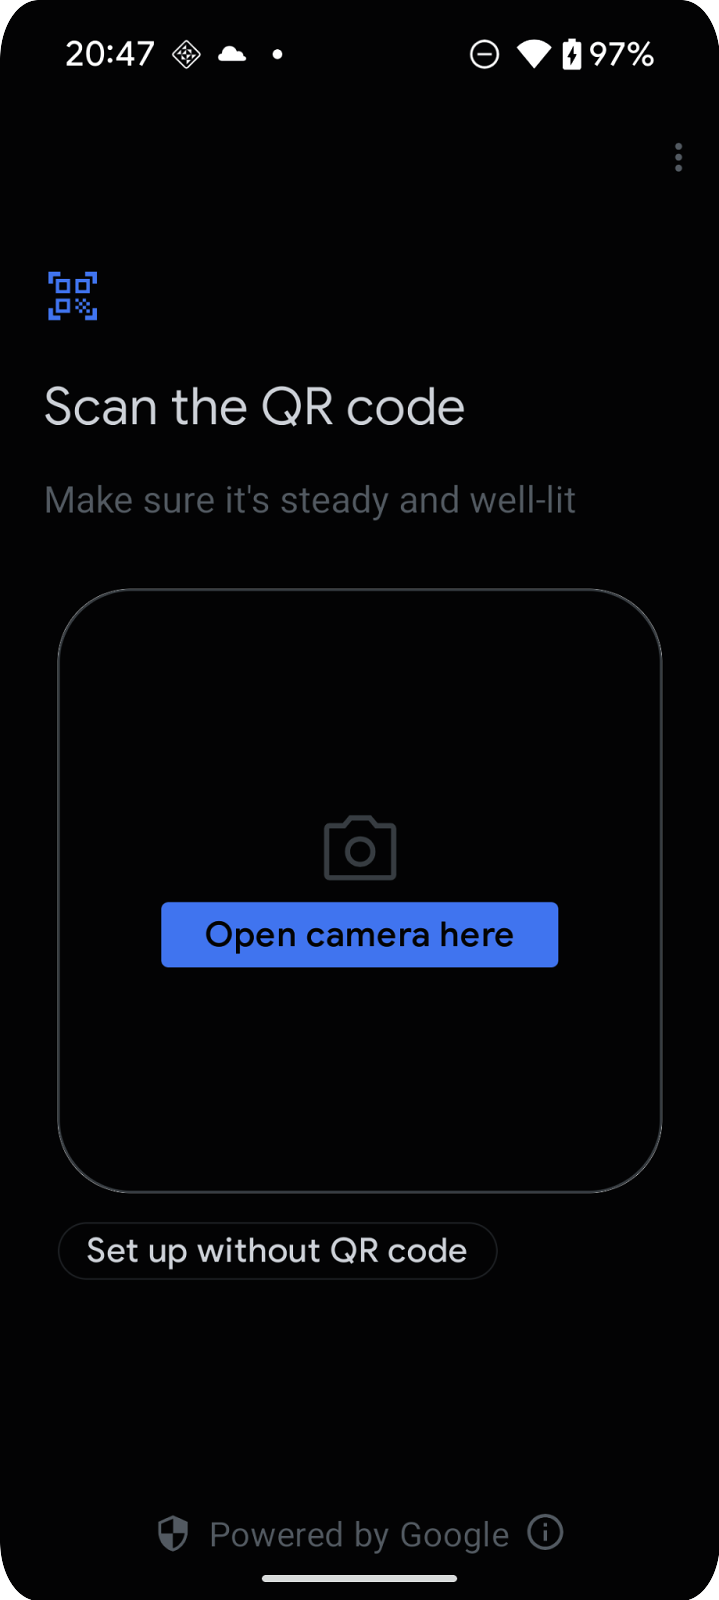
Understand the Commissioning flow
The commissioning flow includes a set of screens that guides the user through adding a device to their Google Account:

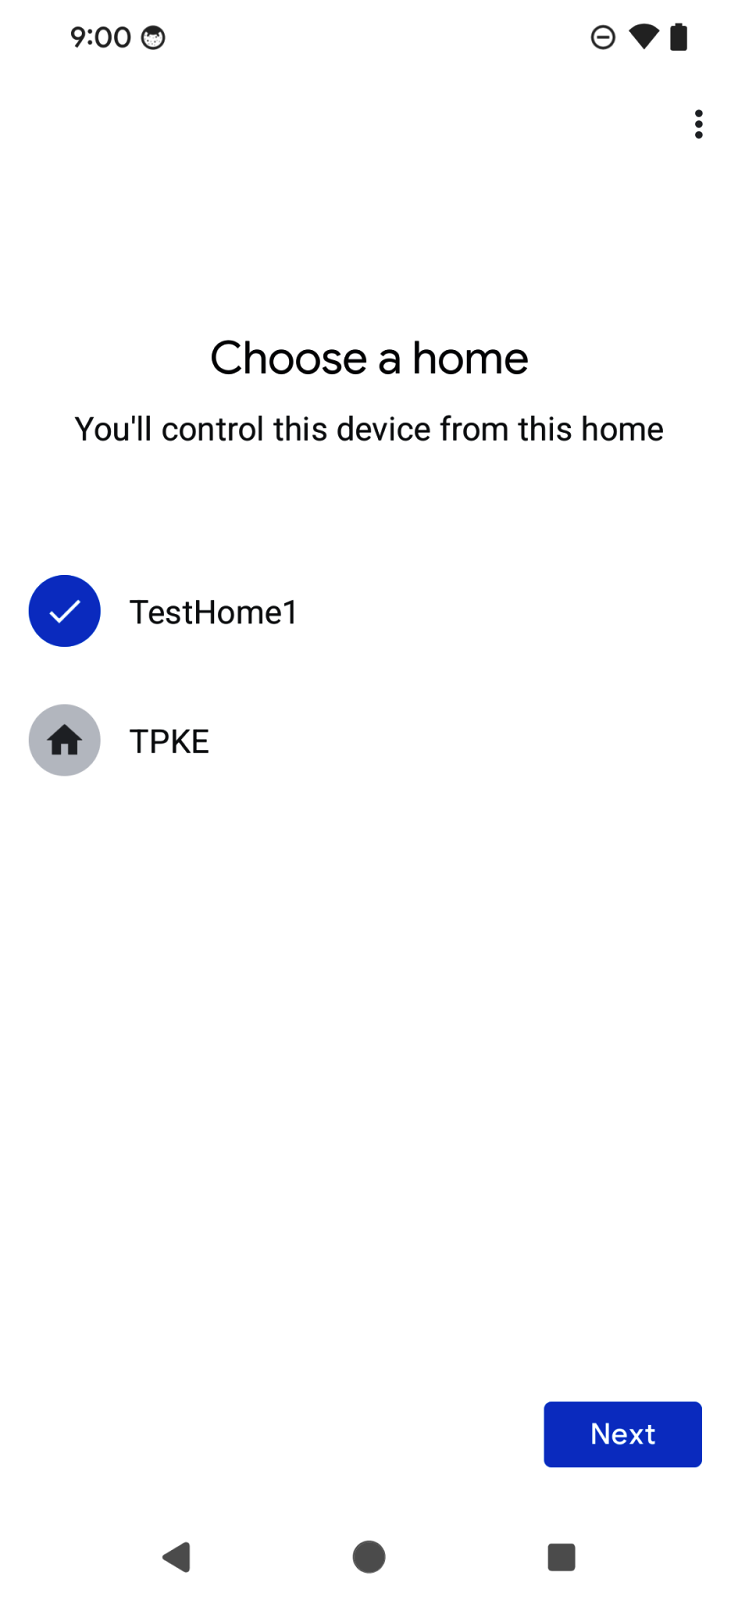
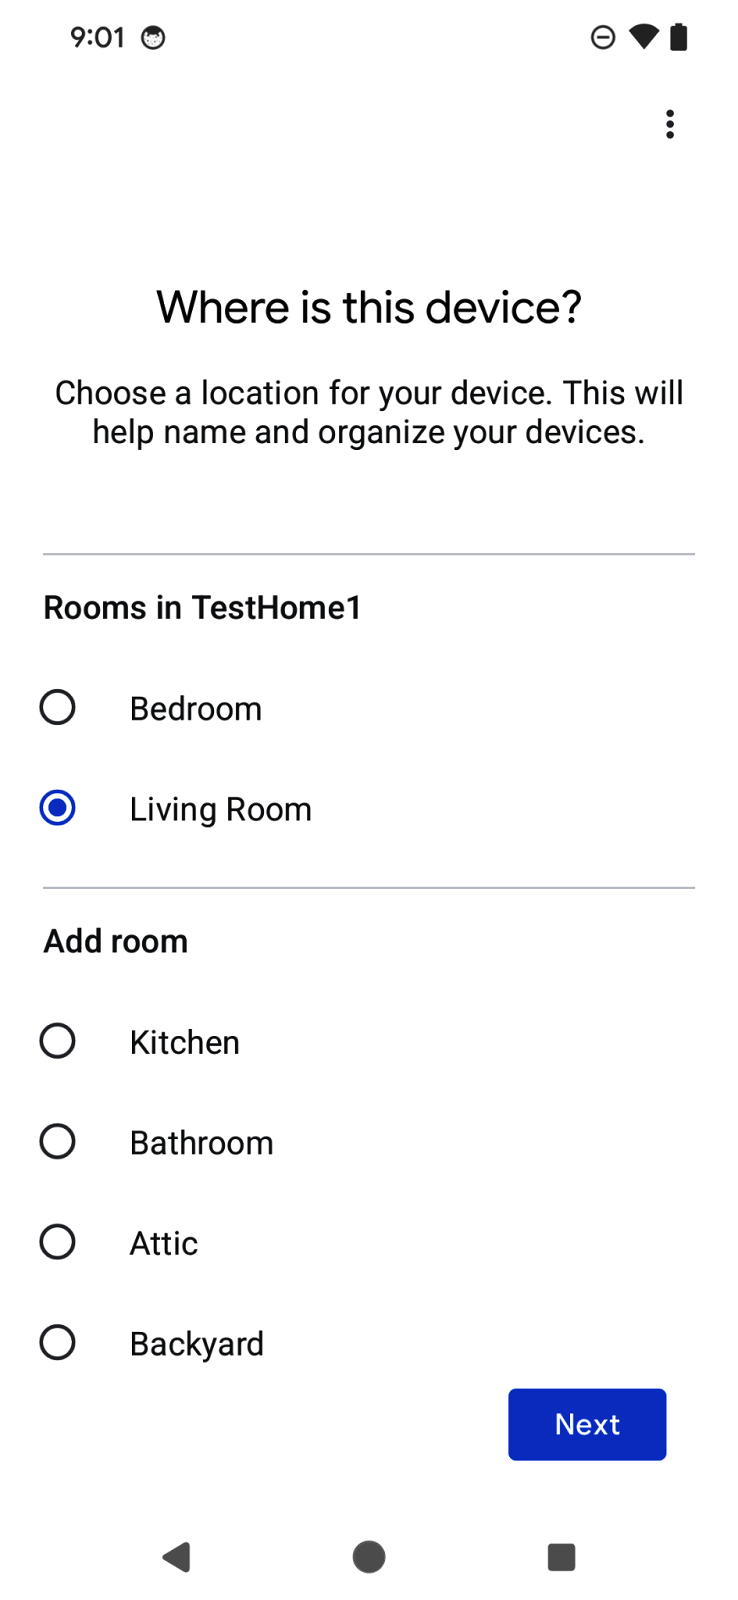
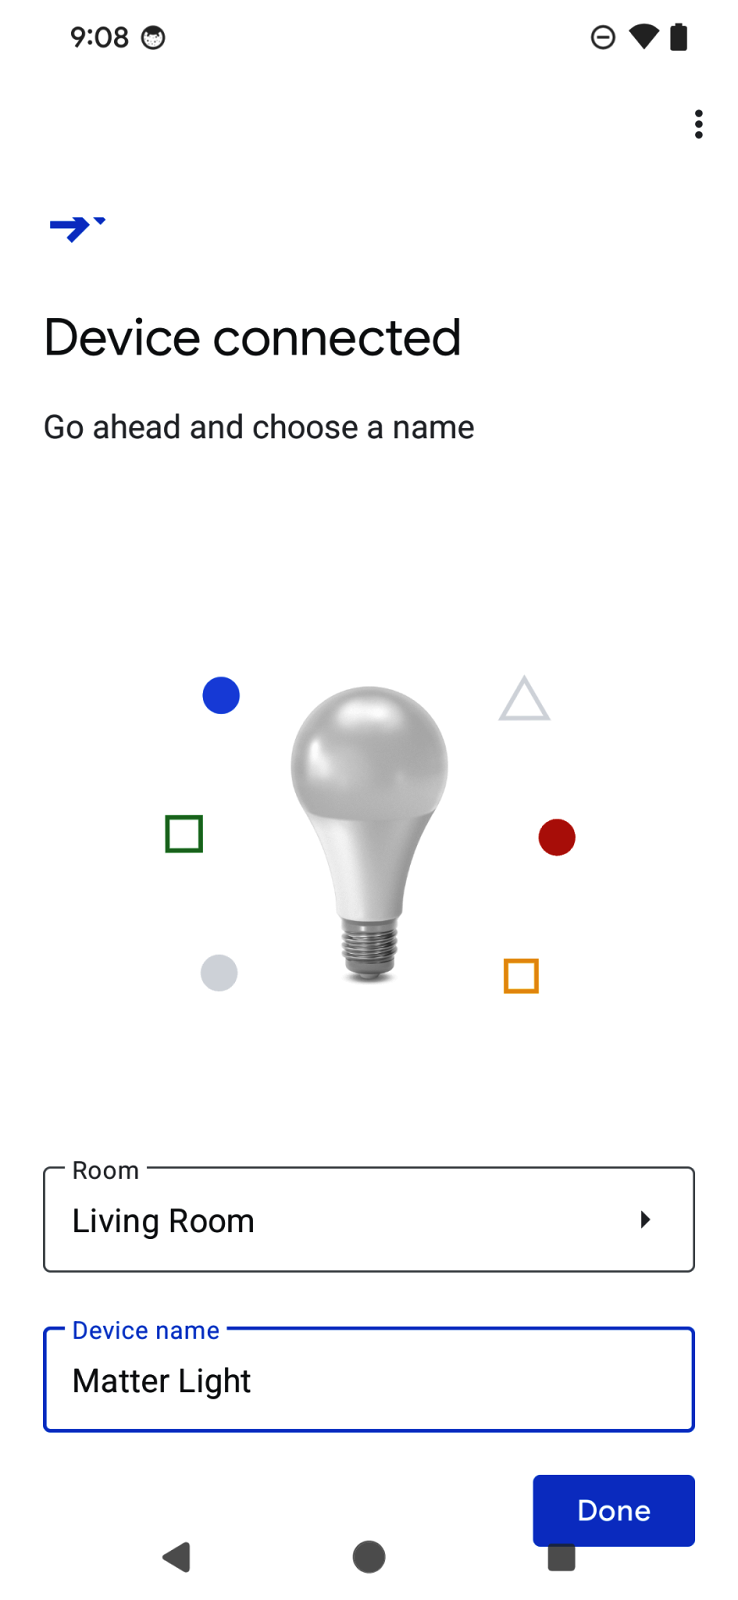
The users will be greeted with a QR code scanner that they can use to scan the QR codes from Matter devices. The flow will then go through displaying the User Agreement, device discovery and commissioning, and naming the device. Once the flow is complete, the flow will change focus back to the app, and pass the commissioning result in the callback function we drafted in the preceding section.
One benefit of the Commissioning APIs is that the UX flow is handled by the SDK, so developers can get up and running very quickly. This also gives the users a consistent experience when adding devices across different apps.
To know more about the commissioning API, visit Commissioning API on Android.
8. Congratulations!
Congratulations! You've successfully created an Android app using the Google Home APIs. Throughout this codelab, you explored Permissions, Devices, Structures, and Commissioning APIs. In the next codelab, Create advanced automations using the Home APIs on Android Codelab, we will explore the Automation and Discovery APIs, and complete the app.
We hope you enjoy building apps that creatively control devices within the Google Home ecosystem.
Next steps
- Continue to the next part of your journey learning the Home APIs on Android by completing the second codelab in this series: Create advanced automations using the Home APIs on Android.
- You can reach out to us with any recommendations, or report any issues through the Issue Tracker, Smart Home support topic.