
This sample iOS application uses the Google Home APIs. Use this guide to build and run the app for the first time.
Prerequisites
Ensure that you have the minimum requirements to use the Home APIs for iOS.
To build and install the Sample App, you'll need a computer with Xcode version 15.3+ installed on it.
To test the app, you'll need:
- A Google Account.
- An Apple ID enrolled in the Apple Developer Program to generate physical device configuration files. If not created already, enrollment incurs an additional cost and may take up to 48 hours to complete.
- An iOS device (not a simulator) running iOS 16.4+ set up with the test account.
- A Wi-Fi network.
- A Google hub that supports the Home APIs.
- A Thread border router if your device requires Thread and your hub doesn't have that capability.
- At least one supported device type.
For development, you'll need a Mac that meets the following requirements:
- macOS Sonoma or later
- Xcode 15.3 or later
Create Apple deployment configuration files
First, an app requires that the App Attest capability be enabled. As a result, it cannot be deployed to simulator devices. This requires you to create a provisioning profile with the App Attest entitlement.
Second, it requires the App Groups be enabled for communication between the app
and the MatterExtension. This requires you to register an app group
identifier.
For more details, see Apple's Create a development provisioning profile on provisioning profiles.
The following outlines the minimum steps required to deploy an app:
- Create an app group identifier for your app to communicate with the
MatterExtension.- Sign in to the Apple Developer Portal.
- Add an app group identifier. For example, it could be
formatted as
group.com.company.commissioning.
- Register your test device to the developer account.
Create a profile for your app target.
- Decide on an application bundle identifier for your app.
The identifier should be unique and descriptive. For example, it could be
formatted as
com.company.HomeApiSample. This identifier will be used throughout the rest of this section. - Register your App ID. When prompted, add the App Attest and App Groups capability.
Edit the newly created App ID and configure the App Groups capability to add the registered app group identifier.
Create a development provisioning profile for your app development. Associate it to your newly created App ID and selected test devices. Ensure you have a developer certificate to sign the app with.
- If you haven't created one yet, see Create Developer ID certificates for instructions.
- Decide on an application bundle identifier for your app.
The identifier should be unique and descriptive. For example, it could be
formatted as
Create a profile for your
MatterExtensiontarget.- Decide on an application bundle identifier for your
MatterExtension. The identifier should be inherited from the app identifier. For example, it could be formatted ascom.company.HomeApiSample.MatterExtension. - Register your App ID. When prompted, add the App Group capability.
- Edit the newly created App ID and configure the App Groups capability to add the registered app group identifier created in the previous steps.
- Create a development provisioning profile
for
MatterExtension.
- Decide on an application bundle identifier for your
Generate the OAuth client ID and enable Home APIs
Your app needs an OAuth client ID to identify itself to Google's authentication backend. For iOS and apps, the OAuth client ID application type must be configured as iOS. The app will also make calls to the Home API. To enable this functionality, the API must be enabled in the Google Cloud project.
Generate the OAuth client ID
- In the Google Cloud console, go to the project selector dashboard and select the project that you want to use to create OAuth credentials.
- Go to the APIs and Services page by clicking on the menu button on the top left hand side > View All Products > APIs & Services.
- In the navigation menu, click Credentials.
If you haven't yet configured your consent screen for this Google Cloud project, the Configure consent screen button appears. In that case, configure your consent screen using the following procedure. If your OAuth consent screen has already been configured and its publishing status is Testing, ensure the test accounts you will use are added to the Test users group. Otherwise, move on to the next step.
- Depending on your use case, select Internal or External, and then click Create. The OAuth consent screen pane displays.
- Enter information on the App information page according to the on-screen instructions, and then click Save and continue. The Scopes pane displays.
- You don't need to add any scopes, so click Save and continue. The Test users pane displays.
- If you opted to create an internal consent screen, you must add users to test access to your app. Click Add users. The Add users pane displays. Test users have the privilege to grant permissions in your app. In the empty field, add one or more Google Account email addresses, and then click Add.
- Click Save and continue. The Summary pane displays.
- Review your OAuth consent screen information, and then click Back to dashboard.
On the left menu panel, click Credentials to create your OAuth client ID.

- Click the CREATE CREDENTIALS button, and select OAuth client ID.
- Under application type, select iOS.
- Enter the Bundle ID with your app identifier and Apple Developer Team ID. The other fields are optional and can be left blank.
- Click CREATE, and note the created Client ID or DOWNLOAD PLIST. This will be used later to enable permissions flow functionality. For more information, see the Create authorization credentials section.
- Click the CREATE CREDENTIALS button, and select OAuth client ID.
Enable the Home APIs
Enable access to the Home APIs.
- In the APIs and Services tab, click Enabled APIs & Services.
- Click ENABLE APIS AND SERVICES at the top of the page.
- Search for the
HOME APIand select it. - In the Home API detail page, click ENABLE.
Download the source code
The source code for the Sample App is available on GitHub.
Navigate to where you want to save the project, then clone it:
git clone https://github.com/google-home/google-home-api-sample-app-ios.gitTo load the project on Xcode, click File > Open, and select
GoogleHomeAPISampleIOS.xcodeproj in the root of the cloned repository.
Add the SDK to the project
The Sample App project requires some additional information in order to build. This includes locally adding the SDK Framework files, populating your developer account identifier information, and populating your OAuth client ID.
Build the app
To download the Home APIs iOS SDK, you must first be signed into Google Home Developers.
Configure your Xcode project for the Sample App:
- Unpack the downloaded SDK into the
ThirdParty/GoogleHomeSDKdirectory relative to the project root directory. - Configure the Developer and OAuth client IDs:
- In the navigation pane, look for the GoogleHomeAPISampleIOS folder and open the Info.plist file for editing.
In the Info.plist file, populate the GIDClientID with your OAuth client ID (see the Set up OAuth consent section), Cloud Project Number corresponding to your cloud project, and the GIDTeamID with the Apple Developer Team ID of the developer account used during the OAuth registration process.
Add App Attest Capability:
- In the Xcode navigation pane, select the
GoogleHomeAPISampleIOSproject file to edit the project configuration. - Click the Signing and Capabilities tab on the top and select the
target
GoogleHomeAPISampleIOSon the left hand side under the TARGETS section. - Just under the Signing and Capabilities tab, click + Capability and search for App Attest.
- Click App Attest to add. If this capability is missing in the search, the project may already have added it.
- In the Xcode navigation pane, select the
Add the App Groups capability.
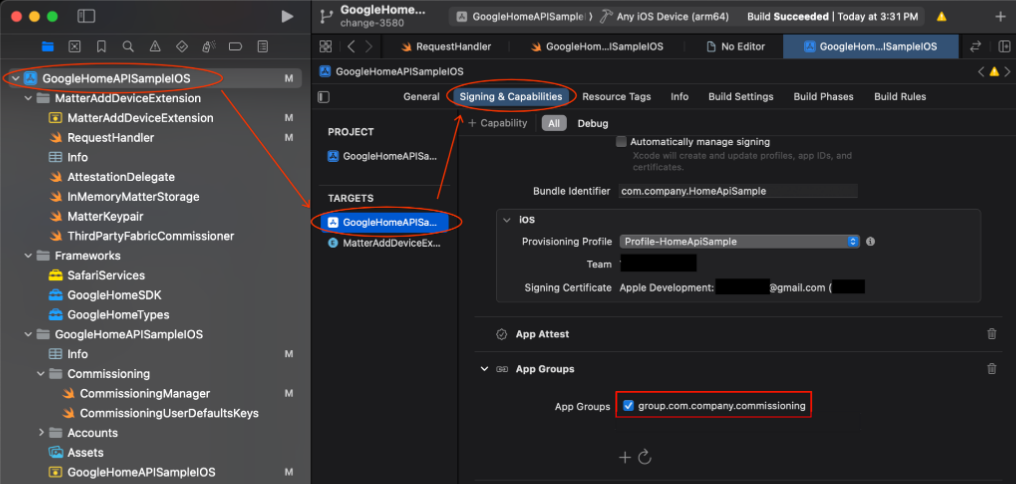
- Go to the GoogleHomeAPISampleIOS project > GoogleHomeAPISampleIOS target.
- Click Signing & Capabilities > + Capability.
- Select the App Groups capability.
- Click the + icon under the App Groups and add the App Groups identifier for your app that you added in the Apple Developer Portal.
- Repeat these steps for the MatterAddDeviceExtension target to add it to the App Groups.
Update the Bundle identifier
- To successfully run and deploy the Sample App on hardware using your developer certificates and provisioning profiles, you will need to provide a unique bundle identifier. This should be the same identifier associated with your OAuth client credentials (see above).
- In the Xcode navigation pane, select the
GoogleHomeAPISampleIOSproject file to edit the project configuration. - Click the Signing and Capabilities tab on the top and select the
target
GoogleHomeAPISampleIOSon the left hand side under the TARGETS section. - Select the Bundle Identifier field in the Signing section and input the unique identifier for the Application.
- Select or install the provisioning profile related to that bundle with the required entitlements.
- Repeat these steps for the
MatterAddDeviceExtensiontarget to input the Bundle identifier for the extension and import its registered provisioning profile.
Update the registered app group identifier in the code.
- The application is required to configure the SDK instance to make use of
the App Group identifier for features such as device commissioning. Update
the app to make use of the App Group ID registered in the Apple Developer
Portal by searching for the string
HOME_API_TODO_ADD_APP_GROUPand replace each instance with it.
These configurations are made in the following files:
GoogleHomeAPISampleIOS.swiftwhen the SDK is initialized.RequestHandler.swiftCommissioningManager.swift
- The application is required to configure the SDK instance to make use of
the App Group identifier for features such as device commissioning. Update
the app to make use of the App Group ID registered in the Apple Developer
Portal by searching for the string